
Introduction
vlayer enables developers to extract, verify and integrate real-world data into Ethereum smart contracts. Our technology is powered by Zero Knowledge Proofs (ZKP) and Multi-Party Computation (MPC), allowing you to securely verify private data without exposing sensitive information.
Our four core features include:
- Web Proofs: Access verified web data, including APIs and websites, in your smart contracts
- Email Proofs: Tap into email content from your smart contracts and use it on-chain
- Time Travel: Leverage historical on-chain data in your smart contracts
- Teleport: Execute a smart contract across different EVM-compatible blockchain networks
vlayer allows smart contracts to be executed off-chain. The result of the execution can then be used by on-chain contracts.
What are some real-world applications of vlayer?
vlayer offers diverse applications across industries that demand secure and privacy-preserving data verification. By enabling users to prove specific facts without revealing underlying personal information, vlayer empowers businesses to build trust without the need to access or store sensitive data like names, birthdates, government IDs, or financial information.
A few real-world applications of vlayer include:
- Use Web Proofs to verify social media engagement for brand partnerships or to generate verifiable proof of asset custody in institutional holdings
- Use Email Proofs to reset account abstraction wallets
- Use Time Travel to verify historical ETH, ERC-721, or ERC-20 balances for airdrops, voting rights, or other on-chain entitlements
- Use proof of holdings on another blockchain as collateral for loans via Teleport
Additional use cases can be found here.
Sections
Getting Started
To get started with vlayer, install vlayer, set up your first project and check out the explainer section to learn how vlayer works. Finally take a look into devnet, testnet & mainnet to learn about vlayer environments.
Features
See how to time travel across block numbers, teleport from one chain to another, prove data coming from email or web and use helpers for JSON and Regex.
From JavaScript
Learn how to interact with vlayer from your JS code and how to generate web proofs and email proofs using our SDK.
Advanced
Learn in-depth how:
- Prover and Verifier contracts are working.
- Global Variables are set.
- Tests are run.
Installation
The easiest way to install vlayer is by using vlayerup, the vlayer toolchain installer.
Supported Platforms
Linux: Only Ubuntu 24.04 LTS or newer versions with x86_64 CPU architecture are supported. Other Linux distributions may work but are not officially supported.
Mac: Macs with Intel CPUs are not supported. Use a Mac with Apple Silicon.
Prerequisites
Before working with vlayer, ensure the following tools are installed:
Additionally, you'll need Bun to run examples. For more details, refer to the Running Examples Locally section.
Get vlayerup
To install vlayerup, run the following command in your terminal, then follow the onscreen instructions.
curl -SL https://install.vlayer.xyz | bash
This will install vlayerup and make it available in your CLI.
Occasionally, vlayerup might require an upgrade. To update it, simply run the same command again.
Using vlayerup
Running vlayerup will install the latest (nightly) precompiled binary of vlayer:
vlayerup
You can check that the binary has been successfully installed and inspect its version by running:
vlayer --version
Installing nightly version
You can use use the following command to install a nightly version of vlayer:
vlayerup --channel nightly
Using vlayer test
In order to execute vlayer test with vlayer examples, vlayer requires risc0-ethereum version 3.0 or higher. Using an older version (< 3.0) will result in proof verification failures due to incompatible control roots and verifier parameters.
To ensure you have the most up-to-date version of the RISC Zero toolchain (cargo-risczero):
cargo install cargo-risczero --force
This installs or updates cargo-risczero to the latest version.
You can check that it has been successfully installed and inspect its version by running:
cargo risczero --version
First steps with vlayer
Creating a new project
Run this command to initialize a new vlayer project:
vlayer init project-name
It creates a folder with sample contracts.
Adding to an existing project
Use the --existing flag to initialize vlayer within your existing Foundry project:
cd ./your-project && vlayer init --existing
Example project
To initialize a vlayer project with example prover and verifier contracts, use the --template flag as shown below:
vlayer init simple --template simple
The following templates are available for quick project setup:
simple: Prove an ERC20 token balance at a specific block number.simple-email-proof: Mint an NFT to the owner of an email address from a specific domain.simple-teleport: Prove a cross-chain ERC20 token balance.simple-time-travel: Prove the average ERC20 token balance across multiple block numbers.simple-web-proof: Mint an NFT to the owner of a specific X/Twitter handle using Web Proofs.kraken-web-proof: Generate server-side web proof of ETH to USD exchange rate and store it on-chain
Directory structure
The vlayer directory structure resembles a typical Foundry project but with two additional folders: src/vlayer and vlayer.
src/vlayer: Contains the Prover and Verifier smart contracts.vlayer: Has contract deployment scripts, client SDK calls to the prover, and verifier transactions.
Running examples
❗️ Make sure that you have Bun installed in your system to build and run the examples.
First off, build the contracts by navigating to your project folder and running:
cd your-project
forge build
This compiles the smart contracts and prepares them for deployment and testing.
Please note that
vlayer initinstalls Solidity dependencies and generatesremappings.txt. Runningforge soldeer installis not needed to build the example and may overwrite remappings, which can cause build errors.
Then, install Typescript dependencies in vlayer folder by running:
cd vlayer
bun install
Testnet
In order to use the testnet, you will need to provide a couple of secrets.
Firstly, create vlayer/.env.testnet.local - this is where you will put all your secret keys in.
Sign up or Log in to dashboard.vlayer.xyz and generate a new testnet Json Web Token (JWT).

Copy generated token (it won't be visible ever again) and save it in vlayer/.env.testnet.local
VLAYER_API_TOKEN=...
❗️ It is important to note that the JWT token is valid for 1 year after which you will need to generate a new token to continue developing using vlayer.
Next provide a private key for deploying example contracts and sending transactions to the verifier in the vlayer/.env.testnet.local file as
EXAMPLES_TEST_PRIVATE_KEY=0x....
By default, optimismSepolia is configured in the vlayer/.env.testnet file. However, you can override this setting to use other testnets.
To change the desired network, set the CHAIN_NAME and JSON_RPC_URL environment variables in vlayer/.env.testnet.local.
Once configured, run the example from within the vlayer directory using:
bun run prove:testnet
Local devnet
Running examples on a local devnet requires deploying a local instance of the prover and anvil. If you want to run on local environment, use Docker:
$ bun run devnet:up
This command will start all required services in the background.
Once the devnet is up, run the example from within the vlayer directory:
bun run prove:dev
Production
In order to use the production, you will need to provide a couple of secrets.
Firstly, create vlayer/.env.mainnet.local - this is where you will put all your secret keys in.
Sign up or Log in to dashboard.vlayer.xyz and generate a new production Json Web Token (JWT).
Copy generated token (it won't be visible ever again) and save it in vlayer/.env.mainnet.local
VLAYER_API_TOKEN=...
Next provide a private key for deploying example contracts and sending transactions to the verifier in the vlayer/.env.mainnet.local file as
EXAMPLES_TEST_PRIVATE_KEY=0x....
By default, optimism is configured in the vlayer/.env.mainnet file. However, you can override this setting to use other chains.
To change the desired network, set the CHAIN_NAME and JSON_RPC_URL environment variables in vlayer/.env.mainnet.local.
Once configured, run the example from within the vlayer directory using:
bun run prove:mainnet
Web Proof example
First, install the vlayer browser extension from the Chrome Web Store (works with Chrome and Brave browsers). For more details about the extension, see the Web Proofs section.
Start web app on localhost:
cd vlayer
bun run web:dev
You can manually deploy WebProofProver and WebProofVerifier as well:
cd vlayer
bun run deploy:dev # deploy to local anvil
bun run deploy:testnet # deploy to testnet
❗️ Ensure the contracts are recompiled after every change with
forge build
The app will be available at http://localhost:5174 and will display buttons that will let you interact with the extension and vlayer server (open browser developer console to see the app activity).
How it works?
vlayer introduces new super powers to Solidity smart contracts:
- Time Travel: Execute a smart contract on historical data.
- Teleport: Execute a smart contract across different blockchain networks.
- Web proof: Access verified web content, including APIs and websites.
- Email proof: Access verified email content.
Prover and Verifier
To implement the above features, vlayer introduces two new contract types: Prover and Verifier.
The Prover code runs on the vlayer zkEVM infrastructure. Proof data structure is the result of this operation.
The Verifier verifies generated proof and runs your code on EVM-compatible chains.
Both types of contracts are developed using the Solidity programming language.
vlayer contract execution
A typical vlayer execution flow has three steps:
- The application initiates a call to the Prover contract that is executed off-chain in the zkEVM. All the input for this call is private by default and is not published on-chain.
- The result of the computation is passed along with a proof to be executed in the on-chain contract. All the output returned from Prover contract is public and is published on-chain as parameters to the Verifier contract.
- The Verifier contract verifies the data sent by the proving party (using the submitted proof by client) and then executes the Verifier code.
See the diagram below.
 The flow of vlayer contract execution
Prover
vlayer Prover contracts have a few distinct properties:
- verifiability - can be executed off-chain and results can't be forged.
- privacy - inputs are private by default and are not published on-chain.
- no gas fees - no usual transaction size limits apply.
All arguments passed to the Prover contract functions are private by default. To make an argument public, simply add it to the list of returned values.
See the example Prover contract code below. It generates proof of ownership of the BYAC (Bored Ape Yacht Club) NFT.
contract BoredApeOwnership is Prover  {
    function main(address _owner, uint256 _apeId) public returns (Proof, address) {
      // jumps to block 12292922 at ETH mainnet (chainId=1), when BYAC were minted
      setChainId(1, 12292922);

      require(IERC721(BYAC_NFT_ADDR).ownerOf(_apeId) == _owner, "Given address not owning that BYAC");

      return (proof(), _owner);
    }
}
In order to access Prover specific features, your contract needs to derive from the vlayer Prover contract. Then setChainId() teleport context to a historic block at Ethereum Mainnet (chainId=1) in which the first mint of BYAC NFT occurred. require makes sure that the given address (_owner) was the owner of the specific _apeId at that point of time. The owner address, which makes it public input for the Verifier contract.
Verifier
The Verifier smart contract validates the correctness of a computation generated by Prover, without revealing the underlying information. Such contracts can be used to facilitate more complex workflows, such as privacy-preserving decentralized finance (DeFi) applications or confidential voting systems.
Verification logic is immutable once deployed on the blockchain, ensuring consistent and permissionless access.
See the example Verifier contract below. It transfers tokens to proven owner of certain NFT:
contract Airdrop is Verifier {
  function claim(Proof calldata _p, address owner)
    public
    onlyVerified(PROVER_VLAYER_CONTRACT_ADDR, NftOwnership.main.selector)
  {
    IERC20(TOKEN_ADDR).transfer(owner, 1000);
  }
}
Note that the above contract inherits from the Verifier vlayer contract.
It is necessary for verifying the computation done by the Prover contract from the previous step.
claim() function takes proof returned by the vlayer SDK as the first argument. Other arguments are public inputs returned from Prover main() function (in the same order).
onlyVerified(address, bytes4) modifier ensures that proof is valid and takes two arguments:
- Address of the Prover contract
- Function selector of the Prover main function
Proof doesn't have to be passed to onlyVerified as an argument. However, it has to be passed as an argument to function that is being decorated with onlyVerified, along with the public outputs.
To learn more about how the Prover and Verifier work under the hood, please refer to our Advanced section.
Devnet, Testnet & Mainnet
The vlayer network consists of several types of nodes: provers, indexers, notaries, and proxies. These nodes are essential for executing vlayer smart contract features, including Time Travel, Teleport, and proofs for Email and Web.
Currently, vlayer supports the following environments:
- testnet: public environment supporting multiple L1 and L2 testnets.
- devnet: local environment that runs with Docker Compose, providing all necessary services for development.
- mainnet: main public network supporting Ethereum Mainnet, Base, Optimism, and Arbitrum.
Testnet
By default, vlayer CLI, SDK, and example apps use the testnet environment, with no additional configuration required.
The Test Prover operates in FAKE mode and works with the following testnets:
| chain | time travel | teleport | email/web |
|---|---|---|---|
| baseSepolia | 🚧 | ✅ | ✅ |
| sepolia | 🚧 | ✅ | ✅ |
| optimismSepolia | ✅ | ✅ | ✅ |
| polygonAmoy | ✅ | ||
| arbitrumSepolia | ✅ | ||
| lineaSepolia | ✅ | ||
| worldchainSepolia | ✅ | ||
| zksyncSepoliaTestnet | ✅ |
✅ Supported, 🚧 In progress
Public Testnet Services
| Service | Endpoint | Description |
|---|---|---|
| Prover | https://stable-fake-prover.vlayer.xyz | zkEVM prover for vlayer contracts |
| Nightly Prover | https://nightly-fake-prover.vlayer.xyz | Nightly version of the zkEVM prover |
| Indexer | https://stable-fake-chainservice.vlayer.xyz | Storage proof indexer |
| Nightly Indexer | https://nightly-fake-chainservice.vlayer.xyz | Nightly version of the indexer |
| Notary | https://test-notary.vlayer.xyz | TLS Notary server |
| WebSocket Proxy | wss://test-wsproxy.vlayer.xyz | Proxying websocket connections for TLS Notary |
Devnet
Devnet allows you to run the full stack locally, including anvil and all required vlayer nodes.
Starting Devnet
Prerequisites
From the vlayer Project
Navigate to the vlayer project directory and start services in the background:
cd ${project}/vlayer
bun run devnet:up
You can stop devnet anytime with:
cd ${project}/vlayer
bun run devnet:down
It is useful in case of any Docker configuration change.
Available Services
| Service | Endpoint | Description |
|---|---|---|
| Anvil-A | http://127.0.0.1:8545 | Local devnet |
| Anvil-B | http://127.0.0.1:8546 | Secondary devnet (for time travel/teleport testing) |
| Anvil-C | http://127.0.0.1:8547 | Tertiary devnet (for time travel/teleport testing) |
| Prover | http://127.0.0.1:3000 | zkEVM prover for vlayer contracts |
| Indexer | http://127.0.0.1:3001 | Storage proof indexer |
| Notary | http://127.0.0.1:7047 | TLS Notary server |
| WebSocket Proxy | ws://127.0.0.1:3003 | Proxying websocket connections |
Clearing Cache
Cached proofs for time travel and teleport are stored in ./chain_db and can be deleted manually:
rm -rf ./chain_db
Mainnet
The Mainnet Prover operates in GROTH16 mode and works with the following chains:
| chain | time travel | teleport | email/web |
|---|---|---|---|
| mainnet | ✅ | ✅ | ✅ |
| base | ✅ | ✅ | ✅ |
| optimism | ✅ | ✅ | ✅ |
✅ Supported, 🚧 In progress
Public Mainnet Services
| Service | Endpoint | Description |
|---|---|---|
| Prover | https://stable-prod-prover.vlayer.xyz | zkEVM prover for vlayer contracts |
| Indexer | https://chainservice.vlayer.xyz | Storage proof indexer |
| Notary | https://notary.vlayer.xyz | TLS Notary server |
| WebSocket Proxy | wss://wsproxy.vlayer.xyz | Proxying websocket connections for TLS Notary |
Prover Modes
The prover server supports two proving modes:
- FAKE: Designed for development and testing purposes, this mode executes code and verifies its correctness without performing actual proving. While the Verifier contract can confirm computations in this mode, it is vulnerable to exploitation by a malicious Prover.
- GROTH16: Intended for production and final testing, this mode performs real proving.
FAKE Mode
Testnet and devnet provers run in FAKE mode by default.
Note: FAKE mode is limited to dev and test chains to prevent accidental errors.
GROTH16 Mode
GROTH16 mode is slower than FAKE mode and requires significant computational resources.
To speed up proof generation, vlayer supports the use of infrastructure like Bonsai (and eventually Boundless) to offload heavy computations to high-performance machines.
To run a prover node in production mode, download and modify call_server/config.toml:
host = "0.0.0.0"
port = 3000
proof_mode = "groth16"

# the rest of the config.toml file...
and call_server/service.yaml:
vlayer-call-server:
    # existing vlayer config
    environment:
      # other env variables...
      BONSAI_API_URL: https://api.bonsai.xyz
      BONSAI_API_KEY: api_key_goes_here
    command: "--config-file /config.toml"
You can request a BONSAI_API_KEY here.
Note: Protocols should be designed with proving execution times in mind, as generating a proof may take several minutes.
Web
Existing web applications including finance, social media, government, ecommerce and many other types of services contain valuable information and can be turned into great data sources.
With vlayer, you can leverage this data in smart contracts.
Web Proofs
Web Proofs provide cryptographic proof of web data served by any HTTPS server, allowing developers to use this data in smart contracts. Only a small subset of the required data is published on-chain.
Web Proofs ensure that the data received has not been tampered with. Without Web Proofs, proving this on-chain is difficult, especially when aiming for an automated and trusted solution.
Example Prover
Let's say we want to mint an NFT for a wallet address linked to a specific X/Twitter handle.
Here’s a sample Prover contract:
import {Strings} from "@openzeppelin-contracts/utils/Strings.sol";
import {Proof} from "vlayer-0.1.0/Proof.sol";
import {Prover} from "vlayer-0.1.0/Prover.sol";
import {Web, WebProof, WebProofLib, WebLib} from "vlayer-0.1.0/WebProof.sol";

contract WebProofProver is Prover {
    using Strings for string;
    using WebProofLib for WebProof;
    using WebLib for Web;

    string dataUrl = "https://api.x.com/1.1/account/settings.json";

    function main(WebProof calldata webProof, address account)
        public
        view
        returns (Proof memory, string memory, address)
    {
        Web memory web = webProof.verify(dataUrl);

        string memory screenName = web.jsonGetString("screen_name");

        return (proof(), screenName, account);
    }
}
What happens in the above code?
-
Setup the
Provercontract:WebProofProverinherits from theProvercontract, enabling off-chain proving of web data.- The
mainfunction receives aWebProof, which contains a signed transcript of an HTTPS session (see the chapter from JS section on how to obtainWebProof). The transcript is signed by a Notary (see Security Considerations section for details about the TLS Notary).
-
Verify the Web Proof:
The call to
webProof.verify(dataUrl)does the following:- Verifies the HTTPS transcript.
- Verifies the Notary's signature on the transcript.
- Ensures the Notary is on the list of trusted notaries (via their signing key).
- Confirms the data comes from the expected domain (
api.x.comin this case). - Check whether the HTTPS data comes from the expected
dataUrl.dataUrlis a URL Pattern against which the actual URL is checked. - Ensures that the server's SSL certificate and its chain of authority are verified.
- Retrieves the plain text transcript for further processing.
-
Extract the relevant data:
web.jsonGetString("screen_name")extracts thescreen_namefrom the JSON response. -
Return the results:
If everything checks out, the function returns the
proofplaceholder,screenName, and theaccount.
If there are no errors and the proof is valid, the data is ready for on-chain verification.
Obtaining Web Proofs
vlayer provides two ways to obtain Web Proofs:
- Client-side (via browser extension)
- Server-side (via the vlayer CLI)
Client-side
The client-side method is intended for scenarios where the target data is authenticated using browser cookies (e.g., logged-in user sessions). It uses the vlayer browser extension to capture and notarize HTTP requests directly from the user’s browsing context.
This approach is ideal for proving access to social media activity, personal or banking data, Web2 loyalty points, reputation scores, or any other cookie-protected content.
💡 Try it Now
To run an example that proves ownership of an X/Twitter handle on your computer, enter the following command in your terminal:
vlayer init --template simple-web-proofThis command will download all the necessary artifacts for your project.
The next steps are explained in the Running Examples and Quickstart Guide.
Server-side
The server-side method is intended for proving data retrieved from HTTP requests that are either public or authenticated via token. It’s a great fit for APIs such as AI models, fintech services, or any backend integration where browser cookie is not required.
💡 Try it Now
To run an example that proves data returned by the Kraken API, enter the following command in your terminal:
vlayer init --template kraken-web-proofThis will download all necessary artifacts to your project.
The next steps are detailed in Running Examples.
Example Verifier
The contract below verifies provided Web Proof and mints a unique NFT for the Twitter/X handle owner’s wallet address.
import {WebProofProver} from "./WebProofProver.sol";
import {Proof} from "vlayer/Proof.sol";
import {Verifier} from "vlayer/Verifier.sol";

import {ERC721} from "@openzeppelin-contracts/token/ERC721/ERC721.sol";

contract WebProofVerifier is Verifier, ERC721 {
    address public prover;

    constructor(address _prover) ERC721("TwitterNFT", "TNFT") {
        prover = _prover;
    }

    function verify(Proof calldata, string memory username, address account)
        public
        onlyVerified(prover, WebProofProver.main.selector)
    {
        uint256 tokenId = uint256(keccak256(abi.encodePacked(username)));
        require(_ownerOf(tokenId) == address(0), "User has already minted a TwitterNFT");

        _safeMint(account, tokenId);
    }
}
What’s happening here?
-
Set up the
Verifier:- The
provervariable stores the address of theProvercontract that generated the proof. - The
WebProofProver.main.selectorgets the selector for theWebProofProver.main()function. WebProofVerifierinherits fromVerifierto access theonlyVerifiedmodifier, which ensures the proof is valid.WebProofVerifieralso inherits fromERC721to support NFTs.
- The
-
Verification checks:
The
tokenId(a hash of the handle) must not already be minted. -
Mint the NFT:
Once verified, a unique
TwitterNFTis minted for the user.
And that's it!
As you can see, Web Proofs can be a powerful tool for building decentralized applications by allowing trusted off-chain data to interact with smart contracts.
Notary
A Notary is a third-party server that participates in a two-sided Transport Layer Security (TLS) session between a client and a server. Its role is to attest that specific communication has occurred between the two parties.
Security Considerations
The Web Proof feature is based on the TLSNotary protocol. Web data is retrieved from an HTTP endpoint and it's integrity and authenticity during the HTTP session is verified using the TLS protocol (the "S" in HTTPS), which secures most modern encrypted connections on the Internet. Web Proofs ensure the integrity and authenticity of web data after the HTTPS session finishes by extending the TLS protocol. Notary, joins the HTTPS session between the client and the server and can cryptographically certify its contents.
From privacy perspective, it is important to note that the Notary server never has access to the plaintext transcript of the connection and therefore, Notary can never steal client data and pretend to be client. Furthermore, the transcript can be redacted (i.e. certain parts can be removed) by the client, making these parts of the communication not accessible by Prover and vlayer infrastructure running the Prover.
Redaction
Trust Assumptions
It is important to understand that the Notary is a trusted party in the above setup. Since the Notary certifies the data, a malicious Notary could collude with a malicious client to create fake proofs that would still be successfully verified by Prover. Currently vlayer runs it's own Notary server, which means that vlayer needs to be trusted to certify HTTPS sessions.
Currently vlayer also needs to be trusted when passing additional data (data other than the Web Proof itself) to Prover smart contract, e.g. account in the example above. The Web Proof could be hijacked before running Prover and additional data, different from the original, could be passed to Prover, e.g. an attacker could pass their own address as account in our WebProofProver example. Before going to production this will be addressed by making the setup trustless through an association of the additional data with a particular Web Proof in a way that's impossible to forge.
vlayer will publish a roadmap outlining how it will achieve a high level of security when using the Notary service.
Custom data source - quick guide
This guide walks you through setting up a development environment, configuring a custom data source, and generating/verifying Web Proofs using vlayer.
Setting up dev environment
Initialize new project using simple-web-proof template:
vlayer init my-web-proof --template simple-web-proof
Enter newly created project:
cd my-web-proof
Build contracts:
forge build
This step must be repeated whenever you modify the prover or verifier contract code.
Navigate to the /vlayer directory and install JavaScript dependencies:
cd vlayer
bun install
Start local devnet:
bun run devnet:up
In a separate terminal, run the example web application:
bun run web:dev
Configuring data source
Once the application is running, you can customize it for your chosen data source. We recommend first obtaining a web proof in your browser.
To configure a new data source, open vlayer/src/hooks/useTwitterAccountProof.ts and examine the steps[] attribute in the webProofConfig object.
Example logic is wrapped within a React Hook, but you can achieve the same thing in vanilla JS.
Now you can set up a new data source:
// specify starting page where extension redirects your user
startPage("https://x.com/", "Go to start page"),
// in case of authentication/redirect go to specific page
expectUrl("https://x.com/home", "Log in"),
// Specify which HTTP endpoint made by the browser from the visited website contains the data to be proven.
// This is typically an asynchronous request — you can inspect it using the Network tab in your browser's developer tools.
notarize(
    "https://api.x.com/1.1/account/settings.json",
    "GET",
    "Generate Proof of Twitter profile",
    [
    {
        request: {
        // redact all the headers
        headers_except: [],
        },
    },
    {
        response: {
        // response from api.x.com sometimes comes with Transfer-Encoding: Chunked
        // which needs to be recognised by Prover and cannot be redacted
        headers_except: ["Transfer-Encoding"],
        },
    },
    ],
),
More detailed description on JS SDK is available in Javascript > Web Proofs section.
If you picked any other data source than api.x.com you would need to regenerate your local API token that sits in vlayer/.env.testnet.
To configure https://api.example.com, run the following command:
vlayer jwt encode -p ./fixtures/jwt-authority.key --subject deadbeef --host "api.example.com" --post 443
Explanation of flags:
-p ./fixtures/jwt-authority.key— Uses a sample private key that generates a valid JWT for the local devnet. Do not modify.--subject deadbeef— Arbitrary identifier for local devnet use. Do not modify.
Obtaining Web Proof
Now you can navigate through example app in your browser (by default running on http://localhost:5137) and check if Chrome browser extension correctly redirects your user to data source. Extension supports Chrome and Brave browsers only.
Finding the correct data source HTTP endpoint can be tricky. We recommend using the Network tab in your browser’s Developer Console. To narrow down the results, filter requests by Fetch/XHR, which helps isolate relevant API calls from the rest.

Finding the correct data source HTTP endpoint
A correctly generated web proof is stored in your browser's localStorage under the webProof key. To inspect localStorage:
- Open Developer Console (F12 or right-click > Inspect).
- Navigate to the "Application" tab.
- In the sidebar, find "Local Storage" and select your site's domain.
- Look for the key
webProof.
Generating ZK proof in the prover
After obtaining the Web Proof via the browser extension, it must be sent to the vlayer prover contract.
That is performed by callProver() function in vlayer/src/components/organisms/ProveStep/Container.tsx.
Through vlayer sdk proof is injected into prover contract: src/vlayer/WebProofProver.sol. Make sure that proper URL is checked there:
Web memory web = webProof.verify("https://api.x.com/1.1/account/settings.json");
Do not forget about building contracts and deploying them after any change in their code:
forge build
cd vlayer
bun run deploy:dev
Verifying on-chain
Once ZK proof is returned from prover it can be used for on-chain verification. Proof along with public inputs has to be passed to WebProofVerifier.sol using a write call:
const writeContractArgs: Parameters<typeof writeContract>[0] = {
    address: import.meta.env.VITE_VERIFIER_ADDRESS as `0x${string}`, // Verifier contract address
    abi: webProofProofVerifier.abi, // ABI for the verifier contract
    functionName: "verify", // Function to call for verification
    args: proofData, // ZK proof data to verify (proof + public input)
};
Whole logic for this step is available in handleMint() in vlayer/src/components/organisms/MintStep/Container.tsx file.
Common Issues / FAQ
Are there any limitations on the data that can be verified?
Currently, we only support JSON payloads. The maximum payload size per request and response is 10 KB.
Can I prove GraphQL responses?
No, this is not supported at the moment.
How can I debug extension errors?
- Right-click on the extension sidebar window.
- Select Inspect.
- Go to the Console tab.
Note: The extension console is separate from your webapp console.
Can I make assertions about JSON attributes?
Yes, assertions must be implemented in the Prover code. You can find more details here.
Server-side proving
vlayer supports generating Web Proofs on the server side. This method is especially useful for proving web data returned by public or token-authenticated APIs, without requiring a browser extension.
Typical use cases include verifying responses from centralized services such as Coinbase, Binance, Kraken, Stripe, Github, Meta, YouTube or similar platforms.
To notarize HTTP requests from the server, use the vlayer CLI:
vlayer web-proof-fetch [OPTIONS] --url <URL>
Available options:
      --url <URL>            Full URL of the request to notarize
      --host <HOST>          Optional host address, if different from the domain provided in URL
      --notary <NOTARY_URL>  Notary URL [default: https://test-notary.vlayer.xyz/]
  -H, --headers <HEADER>     Additional headers (format: "Header-Name: Header-Value")
  -d, --data <DATA>          HTTP data to be sent with the request
  -h, --help                 Print help
  -V, --version              Print version
Example usage:
vlayer web-proof-fetch --url "https://api.kraken.com/0/public/Ticker?pair=ETHUSD"
Such produced Web Proof (including url, headers and body) can be passed into vlayer prover and then verified on-chain.
💡 Try it Now
To run an example that proves data returned by the Kraken API, enter the following command in your terminal:
vlayer init --template kraken-web-proofThis will download all necessary artifacts to your project.
The next steps are detailed in Running Examples.
For proving HTTP requests that rely on httpOnly cookies, use the client-side approach.
Redaction
What is Redaction?
Redaction feature lets you hide sensitive portions of an HTTPS transcript from the Prover. Common use cases include removing cookies, authorization headers, or API tokens before generating a Web Proof. At the same time, everything you leave visible is still cryptographically verified for integrity.
⚠️ Warning! Unsafe byte-range redaction can introduce ambiguities and vulnerabilities. This guide explains how to use redaction safely.
To learn how to enable and configure redaction using the vlayer SDK, see the Redaction section in our JavaScript documentation.
Currently supported redaction targets:
- URL path
- Request headers
- Response headers
Note: Redaction of the response body is currently supported only in unsafe mode, which demands special security concerns. More details will be provided in a future book update.
Security Model
Why Caution Is Needed?
In TLSN Protocol, the foundation for Web Proofs, redaction is performed over raw byte ranges. This means the transcript is treated as an unstructured byte stream, without awareness of HTTP headers, query parameters, or other protocol elements.
For example, this TLSN function redacts bytes from 2 to 4.
redact(2, 4)
Let’s take a closer look at security nuances of specific cases.
URL Redaction
Consider the following redacted URL path (* stands for redacted character):
/user?name=******************
This redacted form could correspond to multiple original inputs, such as:
/user?name=John&surname=Smith
/user?name=JohnathansLongName
Without access to the hidden portion, it is impossible to determine the original URL from the redacted version. This ambiguity arises because the redaction process operates on raw byte ranges of the same length. As a result, only the number of redacted bytes is known, while the structure of the redacted path remains unknown.
Enforcing URL Integrity
To guard against URL redaction issues, WebProof provides two verification modes. They limit the way url can be redacted.
1. Full-URL verification
Use the verify function to check the integrity of the entire, unredacted URL. This mode resolves URL redaction issues by completely disallowing URL redaction. Example:
function main(WebProof calldata webProof) {
    Web memory web = webProof.verify("example.com/user?name=John&surname=Smith")
    ...
}
2. URL prefix verification
Use the verifyWithUrlPrefix function to validate that the redacted URL starts with a known prefix. Example:
function main(WebProof calldata webProof) {
    Web memory web = webProof.verifyWithUrlPrefix("example.com/user?name=")
    ...
}
- Assumes the prefix (“example.com/user?name=”) is correct.
- Treats everything after that prefix as untrusted (it can be redacted).
- Ensures that sensitive suffix data (e.g. user IDs) remains hidden, while protecting contract logic from tampering.
Details on how to prepare a WebProof with redacted URL can be found here.
Header Redaction
Both verify and verifyWithUrlPrefix functions handle header redactions in the same way, and no additional precautions are required to use them safely. Details on how to prepare a WebProof with redacted headers can be found here.
Email Significance
Many online services, from social media platforms to e-commerce sites, require an email address to create an account. According to recent surveys, more than 80% of businesses consider email to be their primary communication channel, both internally and with customers.
All of this means that our inboxes are full of data that can be leveraged.
Proof of Email
With vlayer, you can access email content from smart contracts and use it on-chain.
You do this by writing a Solidity smart contract (Prover) that has access to the parsed email and returns data to be used on-chain. This allows you to create claims without exposing the full content of an email.
Under the hood, we verify mail server signatures to ensure the authenticity and integrity of the content.
Email Safety Requirements
Not all emails that are considered valid by email servers will meet the validity requirements for vlayer. Email servers use various rules based on DMARC, DKIM, and SPF to determine if an email is valid. When creating an Email Proof, only DKIM (DomainKeys Identified Mail) signatures are used to prove the authenticity of an email. Therefore, the following additional preconditions must be met:
- The email must be signed with a DKIM-Signature header.
- The email must be sent from a domain that has a valid DKIM record.
- The email must have exactly one DKIM signature with a
dtag that matches the domain of theFromheader. - The email must have a signed
Fromheader containing a single email address.
If the email doesn't have a DKIM signature with matching signer and sender domains, it may indicate that the sender's email server is misconfigured. Emails from domains hosted on providers like Google Workspaces or Outlook often have a DKIM signature resembling the following:
From: Alice <alice.xyz.com>
DKIM-Signature: v=1; a=rsa-sha256; c=relaxed/relaxed;
   d=xyz-com.***.gappssmtp.com; s=20230601; dara=google.com;
   h=...;
   bh=...;
   b=...
Note that the d tag domain in this example is gappssmtp.com, which is a Google Workspaces domain. The From header domain is xyz.com. This email will not pass the DKIM validation and fail with the Error verifying DKIM: signature did not verify error.
Another potential issue is the use of subdomains.
For example, if the email is sent from [email protected] and the d tag in the DKIM signature is example.com, the email will not be considered valid.
Similarly, if the email is sent from [email protected] and the d tag is subdomain.example.com, the email will also be invalid.
DKIM validation will fail if the email body has been modified by a proxy server. The body hash included in the DKIM signature ensures the integrity of the email’s content. Any alteration to the body will invalidate the signature.
DKIM and DNS Notary
The simplified flow of the DKIM signature is:
-
The sender SMTP server has a private and public key pair.
-
The public key is published in DNS as a TXT record under
<selector>._domainkey.<domain>where:<selector>is a unique identifier unders=tag in the DKIM-Signature header_domainkeyis a fixed string<domain>is the sender's domain, stored in thed=tag in the DKIM-Signature header.
-
The email server adds a DKIM-Signature header to the email and sends it.
-
The recipient SMTP server receives the email.
-
SMTP server checks
DKIM-Signatureheader, reads d= tag ... stating its singers domain and selector, which gives him notion where to look for the key. -
The recipient server fetches the public key from DNS and verifies the signature.
The last step becomes tricky: we don't have the access to DNS from the Solidity level. Instead, we'll have to prove that the DNS record is indeed valid and pass it together with the email to the prover contract.
The DNS Notary (aka. Verifiable DNS) service exists for this reason: it uses the DNS Queries over HTTPS (DoH) protocol to fetch DNS records from several providers, signs them if they are valid and secure, and returns the signature together with the record.
Example
Let's say someone wants to prove they are part of a company or organization. One way to do this is to take a screenshot and send it to the verifier. However, this is not very reliable because screenshot images can be easily manipulated, and obviously such an image cannot be verified on-chain.
A better option is to prove that one can send email from their organization domain. Below is a sample Prover contract that verifies from which domain an email has been sent.
Below is an example of such proof generation:
import {Strings} from "@openzeppelin-contracts-5.0.1/utils/Strings.sol";
import {Proof} from "vlayer-0.1.0/Proof.sol";
import {Prover} from "vlayer-0.1.0/Prover.sol";
import {RegexLib} from "vlayer-0.1.0/Regex.sol";
import {VerifiedEmail, UnverifiedEmail, EmailProofLib} from "vlayer-0.1.0/EmailProof.sol";

contract EmailDomainProver is Prover {
    using RegexLib for string;
    using Strings for string;
    using EmailProofLib for UnverifiedEmail;

    function main(UnverifiedEmail calldata unverifiedEmail, address targetWallet)
        public
        view
        returns (Proof memory, bytes32, address, string memory)
    {
        VerifiedEmail memory email = unverifiedEmail.verify();
        require(email.subject.equal("Verify me for Email NFT"), "incorrect subject");
        // Extract domain from email address
        string[] memory captures = email.from.capture("^[^@]+@([^@]+)$");
        require(captures.length == 2, "invalid email domain");
        require(bytes(captures[1]).length > 0, "invalid email domain");

        return (proof(), sha256(abi.encodePacked(email.from)), targetWallet, captures[1]);
    }
}
It can be convenient to use Regular Expressions to validate the content of the email.
Email is passed to the Solidity contract as an UnverifiedEmail structure that can be created using the preverifyEmail function in the SDK.
preverifyEmail should be called with the raw .eml file content as an argument (learn how to get this file). The email is also required to have From and DKIM-Signature headers.
You can also use the preverifyEmail function inside the Solidity tests.
struct UnverifiedEmail {
  string email;
  string[] dnsRecords;
}
First, we verify the integrity of the email with the verify() function. Then we have a series of assertions (regular Solidity require()) that check the email details.
If one of the string comparisons fails,
requirewill revert the execution, and as a result, proof generation will fail.
💡 Try it Now
To run the above example on your computer, type the following command in your terminal:
vlayer init --template simple-email-proofThis command will download, create, and initialize a new project with sample email proof contracts.
Email structure
The email structure of type VerifiedEmail is a result of the UnverifiedEmail.verify() function.
Since the verify function actually verifies the passed email, VerifiedEmail's fields can be trusted from this point.
struct VerifiedEmail {
  string from;
  string to;
  string subject;
  string body;
}
A VerifiedEmail consists of the following fields:
from- a string consisting of the sender's email address (no name is available);to- a string consisting of the intended recipient's email address (no name is available);subject- a string with the subject of the email;body- a string consisting of the entire body of the email.
By inspecting and parsing the email payload elements, we can generate a claim to be used on-chain.
Note: If multiple headers share the same name (for example, two
From:lines), we always use the last one encountered when parsing or verifying headers (i.e. headers are processed in reverse order). See RFC 6376 §5.4.2 for details.
Getting .eml Files
Obtaining an .eml file can be helpful for development purposes, such as testing your own email proofs. Below are instructions for retrieving .eml files from common email clients.
Gmail
- Open the email you want to save.
- Click the three-dot menu in the top-right corner of the email.
- Select Download message.

Outlook / Thunderbird
- Open the email you want to save.
- Click on the File menu.
- Select "Save As".
Security Assumptions
Billions of users trust providers to deliver and store their emails. Inboxes often contain critical information, including work-related data, personal files, password recovery links, and more. Email providers also access customer emails for purposes like serving ads. Email proofs can only be as secure as the email itself, and the protocol relies on the trustworthiness of both sending and receiving servers.
Outgoing Server
The vlayer prover verifies that the message signature matches the public key listed in the DNS records. However, a dishonest outgoing server can forge emails and deceive the prover into generating valid proofs for them. To mitigate this risk, vlayer supports only a limited number of the world's most trusted email providers.
Preventing Unauthorized Actions
Both outgoing and incoming servers can read emails and use them to create proofs without the permission of the actual mail sender or receiver. This risk also extends to the prover, which accesses the email to generate claims. It is crucial for protocols to utilize email proofs in a manner that prevents the manipulation of smart contracts into performing unauthorized actions, such as sending funds to unintended recipients.
For example, it is advisable to include complete information in the email to ensure correct actions. Opt for emails like: "Send 1 ETH from address X to address Y on Ethereum Mainnet" over partial instructions, like: "Send 1 ETH," where other details come from another source, such as smart contract call parameters. Another approach is to use unique identifiers that unambiguously point to the necessary details.
From header format
We only accept a single local@domain address, checked as follows:
-
One mailbox: exactly one address, no groups/lists
-
Local(1–64 chars):- May include letters (A–Z, a–z), digits (0–9), and these symbols:
! # $ % & ' * + - / = ? ^ _ { | } ~ - Periods (
.) can appear between characters, but not at the very start or end, and never two in a row.
- May include letters (A–Z, a–z), digits (0–9), and these symbols:
-
Domain(1–255 chars):- Made of one or more labels separated by periods, e.g.
example.com→example+com - Each label can only use letters (
A–Z,a–z), digits (0–9), or hyphens (-) - A label may not begin or end with a hyphen, and labels can’t be empty (no
..)
- Made of one or more labels separated by periods, e.g.
Time travel
Access to historical data
Unfortunately, direct access to the historical state from within smart contracts is not possible. Smart contracts only have access to the current state of the current block.
To overcome this limitation, vlayer introduced the setBlock(uint blockNo) function, available in our Prover contracts. This function allows switching context of subsequent call to the desired block number.
This allows aggregating data from multiple blocks in a single call to a function.
Example
Prover
The following is an example of Prover code that calculates the average USDC balance at specific block numbers.
contract AverageBalance is Prover {
    IERC20 immutable token;
    uint256 immutable startingBlock;
    uint256 immutable endingBlock;
    uint256 immutable step;

    constructor() {
        token = IERC20(0xA0b86991c6218b36c1d19D4a2e9Eb0cE3606eB48); // USDC
        startingBlock = 6600000;
        endingBlock = 6700000;
        step = 10000;
    }

    function averageBalanceOf(address _owner) public returns (Proof, address, uint256) {
        uint256 totalBalance = 0;
        uint256 iterations = 0;

        for (uint256 blockNo = startingBlock; blockNo <= endingBlock; blockNo += step) {
            setBlock(blockNo);
            totalBalance += token.balanceOf(_owner); // USDC balance
            iterations += 1;
        }
        return (proof(), _owner, totalBalance / iterations);
    }
}
First call to the setBlock(blockNo) function sets the Prover context for the startingBlock (6600000 configured in the constructor). This means that the next call to the token.balanceOf function will read data in the context of the 6600000 block.
Next call to setBlock() sets the Prover context to block numbered 6610000 when step is configured to 10000. The subsequent call to token.balanceOf checks again total balance, but this time in block 6610000.
Each call to token.balanceOf can return different results if the account balance changes between blocks due to token transfers.
The for loop manages the balance checks, and the function’s final output is the average balance across multiple blocks.
Verifier
After proving is complete, the generated proof and public inputs can be used for on-chain verification.
contract AverageBalanceVerifier is Verifier {
    address public prover;
    mapping(address => bool) public claimed;
    HodlerBadgeNFT public reward;

    constructor(address _prover, HodlerBadgeNFT _nft) {
        prover = _prover;
        reward = _nft;
    }

    function claim(Proof calldata, address claimer, uint256 average)
        public
        onlyVerified(prover, AverageBalance.averageBalanceOf.selector)
    {
        require(!claimed[claimer], "Already claimed");

        if (average >= 10_000_000) {
            claimed[claimer] = true;
            reward.mint(claimer);
        }
    }
}
In this Verifier contract, the claim function allows users to mint an NFT if their average balance is at least 10,000,000. The onlyVerified modifier ensures the correctness of the proof and the provided public inputs (claimer and average).
If the proof is invalid or the public inputs are incorrect, the transaction will revert.
💡 Try it Now
To run the above example on your computer, type the following command in your terminal:
vlayer init --template simple-time-travelThis command will download all the necessary artefacts into your current directory (which must be empty). Make sure you have Bun and Foundry installed on your system.
Teleport
Ethereum ecosystem of chains
The Ethereum ecosystem is fragmented, consisting of various EVM chains such as Base, Arbitrum, Optimism, and many more. Developing applications that interact with multiple chains used to be challenging, but Teleport makes it easy.
Teleporting betweens chains
setChain(uint chainId, uint blockNo) function, available in Prover contracts, allows to switch the context of execution to another chain (teleport). It takes two arguments:
chainId, which specifies the chain in the context of which the next function call will be executedblockNo, which is the block number of the given chain
Note: At the moment, teleportation is only supported from L1 Ethereum chains (Ethereum mainnet and Ethereum sepolia) to optimistic L2 chains. When we teleport from mainnet, we can only teleport to optimistic L2 mainnet chains, and from sepolia we can only teleport to optimistic L2 sepolia.
Example
Prover
The example below shows how to check USDC balances across three different chains. Following tokens are passed to the constructor:
Erc20Token[] memory tokens = [
    Erc20Token(0xA0b86991c6218b36c1d19D4a2e9Eb0cE3606eB48, 1, 20683110), // mainnet
    Erc20Token(0x833589fCD6eDb6E08f4c7C32D4f71b54bdA02913, 8453, 19367633), // base
    Erc20Token(0x0b2C639c533813f4Aa9D7837CAf62653d097Ff85, 10, 124962954) // optimism
];
contract SimpleTeleportProver is Prover {
    Erc20Token[] public tokens;

    constructor(Erc20Token[] memory _tokens) {
        for (uint256 i = 0; i < _tokens.length; i++) {
            tokens.push(_tokens[i]);
        }
    }

    function crossChainBalanceOf(address _owner) public returns (Proof memory, address, uint256) {
        uint256 balance = 0;

        for (uint256 i = 0; i < tokens.length; i++) {
            setChain(tokens[i].chainId, tokens[i].blockNumber);
            balance += IERC20(tokens[i].addr).balanceOf(_owner);
        }

        return (proof(), _owner, balance);
    }
}
First, the call to setChain(1, 20683110) sets the chain to Ethereum mainnet (chainId = 1). Then, the ERC20 balanceOf function retrieves the USDC balance of _owner at block 20683110.
Next, setChain(8453, 19367633) switches the context to the Base chain. The balanceOf function then checks the balance at block 19367633, but this time on the Base chain.
Subsequent calls are handled by a for loop, which switches the context to the specified chains and block numbers accordingly.
Verifier
After proving is complete, the generated proof and public inputs can be used for on-chain verification.
contract SimpleTravel is Verifier {
    address public prover;
    mapping(address => bool) public claimed;
    WhaleBadgeNFT public reward;

    constructor(address _prover, WhaleBadgeNFT _nft) {
        prover = _prover;
        reward = _nft;
    }

    function claim(Proof calldata, address claimer, uint256 crossChainBalance)
        public
        onlyVerified(prover, SimpleTravelProver.crossChainBalanceOf.selector)
    {
        require(!claimed[claimer], "Already claimed");

        if (crossChainBalance >= 10_000_000_000_00) { // 100 000 USD
            claimed[claimer] = true;
            reward.mint(claimer);
        }
    }
}
In this Verifier contract, the claim function lets users mint an NFT if their cross-chain USDC average balance is at least $100,000. The onlyVerified modifier ensures that the proof and public inputs (claimer and crossChainBalance) are correct.
If the proof or inputs are invalid, the transaction will revert, and the NFT will not be awarded.
💡 Try it Now
To run the above example on your computer, type the following command in your terminal:
vlayer init --template simple-teleportThis command will download all the necessary artefacts into your current directory (which must be empty). Make sure you have Bun and Foundry installed on your system.
Finality considerations
Finality, in the context of blockchains, is a point at which a transaction or block is fully confirmed and irreversible. When using vlayer setChain teleports, chain finality is an important factor to consider.
One should be aware that different chains may have different finality thresholds. For example, Ethereum Mainnet blocks are final after no more than about 12 minutes.
In the case of L2 chains, things are a bit more complicated. For example in case of optimistic rollup, like Optimism and Arbitrum, after L2 blocks are submitted to L1, there's a challenge period (often 7 days). If there is no evidence of an invalid state transition during this period, the L2 block is considered final.
Now consider teleporting to blocks that are not yet final in the destination chain. This can lead to situations where we are proving things that can be rolled back. It is important to include this risk in a protocol. The simplest way is to only teleport to blocks that are final and cannot be reorganized.
JSON Parsing and Regular Expressions
When dealing with Web Proofs, the ability to parse JSON data is essential. Similarly, finding specific strings or patterns in the subject or body of an email is crucial for Email Proofs.
To support these needs, we provide helpers for parsing text using regular expressions and extracting data from JSON directly within vlayer Prover contracts.
JSON Parsing
We provide four functions to extract data from JSON based on the field type:
jsonGetInt(json, path): Extracts an integer value and returnsint256;jsonGetBool(json, path): Extracts a boolean value and returnsbool;jsonGetString(json, path): Extracts a string value and returnsstring memory;jsonGetFloatAsInt(json, path, precision): Extracts a decimal number from JSON, moves its decimal point right by the specifiedprecision, and returns it as a truncatedint256. Ifprecisionis greater than the number of decimal digits, it pads it with zeros. For example, reading1.234at precision2yields123, and at precision4yields12340. This approach is used because Solidity does not support floating-point numbers.
import {Prover} from "vlayer/Prover.sol";
import {Web, WebLib} from "vlayer/WebProof.sol";

contract JSONContainsFieldProof is Prover {
    using WebLib for Web;

    function main(Web memory web) public returns (Proof memory, string memory) {
        require(web.jsonGetInt("deep.nested.field") == 42, "deep nested field is not 42");

        // If we return the provided JSON back, we will be able to pass it to verifier
        // Together with a proof that it contains the field
        return (proof(), web.body);
    }
}
In the example above, the function extracts the value of the field deep.nested.field from the JSON string below and checks if it equals 42.
{
  "deep": {
    "nested": {
      "field": 42
    }
  }
}
The functions will revert if the field does not exist or if the value is of the wrong type.
Jmespath
Field paths provided to jsonGet... functions are evaluated using JMESPath, a query language for JSON that allows powerful expressions beyond simple key access.
For example, to get the number of elements in an array:
int256 length = web.jsonGetInt("root.nested_level.field_array | length(@)");
require(length == 2, "Expected array of length 2");
To access a specific element from an array:
string memory value = web.jsonGetString("root.nested_level.field_array[1]");
require(keccak256(bytes(value)) == keccak256("val2"), "Unexpected array value");
You can also access fields within arrays of objects:
int256 value = web.jsonGetInt("root.nested_level.field_array_of_objects_with_numbers[1].key");
require(value == 2, "Expected value at index 1");
This makes it easy to work with complex JSON structures directly inside your prover logic, without needing preprocessing.
Regular Expressions
Regular expressions are a powerful tool for finding patterns in text.
We provide functions to match and capture a substring using regular expressions:
matcheschecks if a string matches a regular expression and returnstrueif a match is found;capturechecks if a string matched a regular expression and returns an array of strings. First string is the whole matched text, followed by the captures.
Regex size optimization
Internally, the regular expression is compiled into a DFA.
The size of the DFA is determined by the regular expression itself, and it can get quite large even for seemingly simple patterns.
It's important to remember that the DFA size corresponds to the cycles used in the ZK proof computation, and therefore it is important to keep it as small as possible.
We have a hard limit for a DFA size which should be enough for most use cases.
For example the regex "\w" includes all letters including the ones from unicode and as a result will be over 100x larger than a simple "[a-zA-Z0-9]" pattern.
In general, to bring the compiled regular expression size down, it is recommended to use more specific patterns.
import {Prover} from "vlayer/Prover.sol";
import {RegexLib} from "vlayer/Regex.sol";

contract RegexMatchProof is Prover {
    using RegexLib for string;

    function main(string calldata text, string calldata hello_world) public returns (Proof memory, string memory) {
        // The regex pattern is passed as a string
        require(text.matches("^[a-zA-Z0-9]*$"), "text must be alphanumeric only");

        // Example for "hello world" string
        string[] memory captures = hello_world.capture("^hello(,)? (world)$");
        assertEq(captures.length, 3);
        assertEq(captures[0], "hello world");
        assertEq(captures[1], "");
        assertEq(captures[2], "world");

        // Return proof and provided text if it matches the pattern
        return (proof(), text);
    }
}
Vanilla JS/TS
JavaScript
A common way to interact with blockchain is to make calls and send transactions from JavaScript, most often from a web browser. vlayer provides developer friendly JavaScript/TypeScript API - vlayer SDK. It combines well with the standard way of interacting with smart contracts.
Installation
To install vlayer SDK, run the following command in your JavaScript application
yarn add @vlayer/sdk
vlayer client
The vlayer client provides an interface for interacting with the vlayer JSON-RPC API. It enables you to trigger and monitor proof statuses while offering convenient access to features such as Web Proofs and Email Proofs.
Initializing
You can initialize a client as shown below:
import { createVlayerClient } from "@vlayer/sdk";

const vlayer = createVlayerClient();
Proving
In order to start proving, we will need to provide:
address- an address of prover contractproverAbi- abi of prover contractfunctionName- name of prover contract function to callargs- an array of arguments tofunctionNameprover contract functionchainId- id of the chain in whose context the prover contract call shall be executed
const hash = await vlayer.prove({
  address: '0x70997970c51812dc3a010c7d01b50e0d17dc79c8',
  proverAbi: proverSpec.abi,
  functionName: 'main',
  args: ['0xd8dA6BF26964aF9D7eEd9e03E53415D37aA96045', 123],
  chainId: chain.id,
});
Waiting for result
Wait for the proving to be finished, and then retrieve the result along with Proof.
const result = await vlayer.waitForProvingResult({ hash });
By default, the waitForProvingResult function polls the server for a proof for 15 minutes. This is achieved through 900 retries with a polling interval of 1 second.
You can customize this behavior by specifying the following optional parameters:
numberOfRetries: The total number of polling attempts.sleepDuration: The delay (in ms) between each polling attempt. For example, if you want to extend the polling duration to 180 seconds with a 2-second delay between attempts, you can configure it as follows:
const provingResult = await vlayer.waitForProvingResult({
  numberOfRetries: 90,  // Total retries (180s / 2)
  sleepDuration: 2000,  // 2s interval between retries
});
On-Chain verification
Once the proving result is obtained, one may call the verifier contract to validate the proof. Below is an example using the viem library's writeContract function:
// Create client, see docs here: https://viem.sh/docs/clients/wallet
// const client = createWalletClient({...});

const txHash = await client.writeContract({
  address: verifierAddr,
  abi: verifierSpec.abi,
  functionName: "verify",
  args: provingResult,
  chain,
  account,
});
React Hooks for vlayer
@vlayer/react is a library of React hooks for interacting with the vlayer.
These hooks provide functions that help manage state and side effects in React components, aligning with React's functional programming paradigm and style of wagmi hooks.
Prerequisites
The following libraries are required to use @vlayer/react:
- React: A library for building user interfaces.
- Wagmi: A library of React hooks for Ethereum.
- TanStack Query: A library for efficient data fetching and caching.
Add them to your project if they are not already present:
yarn add react react-dom wagmi @tanstack/react-query
Installation
Install the @vlayer/react library using preferred package manager:
yarn add @vlayer/react
Context Providers
Wrap the application with the required React Context Providers and configure the desired connectors and chains to enable @vlayer/react hooks.
import { WagmiProvider, http, createConfig } from "wagmi";
import { baseSepolia, sepolia,optimismSepolia, foundry } from "wagmi/chains";
import { metaMask } from "wagmi/connectors";
import { QueryClient, QueryClientProvider } from "@tanstack/react-query";
import { ProofProvider } from "@vlayer/react";

const wagmiConfig = createConfig({
  chains: [baseSepolia, sepolia, optimismSepolia, foundry],
  connectors: [metaMask()],
  transports: {
    [baseSepolia.id]: http(),
    [sepolia.id]: http(),
    [optimismSepolia.id]: http(),
    [foundry.id]: http(),
  },
});

const queryClient = new QueryClient();

function App() {
  return (
    <WagmiProvider config={wagmiConfig}>
      <QueryClientProvider client={queryClient}>
        <ProofProvider>
          {/* Application components go here */}
        </ProofProvider>
      </QueryClientProvider>
    </WagmiProvider>
  );
}

export default App;
Context providers facilitate the sharing of application state (e.g., connected wallet, selected chain) across components. Once the setup is complete, components wrapped within the WagmiProvider, QueryClientProvider, and ProofProvider can use the vlayer hooks.
Your section on configuring ProofProvider is well-structured and clear. Here are some suggestions to improve grammar, style, and clarity while maintaining the current structure:
Configuring ProofProvider
The ProofProvider component in vlayer is pre-configured for the testnet environment by default, requiring no additional props for basic usage:
<ProofProvider>
    {/* Application components go here */}
</ProofProvider>
Using the config Prop
The ProofProvider also accepts an optional config prop, enabling you to select the desired env. Based on the chosen environment, the provider is automatically configured with the default and pre-configured URLs necessary to access vlayer network services:
<ProofProvider
  config={{
    env: "dev|testnet|prod", // Specify the environment
  }}
>
    {/* Application components go here */}
</ProofProvider>
Customizing Service URLs
In addition to selecting an environment, the config prop allows you to specify custom URLs for vlayer network services. These include services like proverUrl, notaryUrl, and wsProxyUrl:
<ProofProvider
  config={{
    proverUrl: "https://stable-fake-prover.vlayer.xyz",
    notaryUrl: "https://test-notary.vlayer.xyz",
    wsProxyUrl: "wss://test-wsproxy.vlayer.xyz",
  }}
>
    {/* Application components go here */}
</ProofProvider>
useCallProver
The useCallProver hook is used to interact with the vlayer prover by initiating a proving process with specified inputs.
Example usage
The callProver function initiates the proving process. Proving is an asynchronous operation, and the result (data) contains a hash that can be used to track the status or retrieve the final proof.
import { useCallProver } from "@vlayer/react";

const ExampleComponent = () => {
  const {
    callProver,
    data,
    status,
    error,
    isIdle,
    isPending,
    isReady,
    isError
  } = useCallProver({
    address: proverAddress,     // Address of the prover contract
    proverAbi: proverSpec.abi,  // ABI of the prover
    functionName: "main",       // Function to invoke in the prover
  });

  return (
    <button onClick={() => callProver([...args])}>
      Prove
    </button>
  );
}
The callProver function has to be invoked with the required arguments by the prover contract function.
Besides proof hash, the hook returns variables to monitor the request and update the UI:
status: Overall status of the initial call to the prover (idle,pending,ready, orerror).isIdle: Indicates that no prover call has been initiated.isPending: Indicates the waiting for proving hash is ongoing.isReady: Indicates the proving hash is available.isError: Indicates an error occurred.error: Contains the error message if an error occurred.
useWaitForProvingResult
The useWaitForProvingResult hook waits for a proving process to complete and retrieves the resulting proof.
Example usage
Pass the proof hash to the hook to monitor the proving process and retrieve the proof (data) when it is ready. If no hash (null) is provided, no request is sent to the prover.
Proof computation is an asynchronous operation, and depending on the complexity of the proof, it may take a few seconds to complete. Proof is null until the computation is complete.
import { useWaitForProvingResult, useCallProver } from "@vlayer/react";

const ExampleComponent = () => {
  const { callProver, data: proofHash } = useCallProver({
    address: proverAddress,     // Address of the prover contract
    proverAbi: proverSpec.abi,  // ABI of the prover
    functionName: "main",       // Function to invoke in the prover
  });

  const {
    data,
    error,
    status,
    isIdle,
    isPending,
    isReady,
    isError
  } = useWaitForProvingResult(proofHash);

  return (
    <button onClick={() => callProver([...args])}>
      Prove
    </button>
  );
}
The hook provides additional properties for tracking progress and managing UI updates:
status: Indicates the status of the proving result (idle,pending,ready, orerror).isIdle: Indicates the hook is not triggered.isPending: Indicates the proof computation is ongoing.isReady: Indicates the final proof is available.isError: Indicates an error occurred during proving.error: Contains the error message returned by the prover
💡 Try it Now
To see vlayer React hooks in action, run the following command in your terminal:
vlayer init --template simple-email-proofThis command will download create a new project. Check out the
vlayer/src/components/EmlForm.tsxfile to see how vlayer React hooks are used.
Web proofs from javascript
Web Proofs
On top of access to vlayer JSON-RPC proving API, vlayer client provides functionality to generate and prove Web Proofs.
vlayer browser extension

vlayer provides a browser extension which can be launched (once installed in user's browser) from vlayer SDK and used to generate a Web Proof of a 3rd party website.
vlayer extension is compatible with Chrome and Brave browsers.
We start by instantiating vlayer client.
import { createVlayerClient } from '@vlayer/sdk'

const vlayer = createVlayerClient()
Next, we can define how the vlayer extension should generate the Web Proof. We do this in a declarative way, by specifying the steps the extension should guide the user through.
import {
  createWebProofRequest,
  startPage,
  expectUrl,
  notarize,
} from '@vlayer/sdk/web_proof'

const webProofRequest = createWebProofRequest({
  steps: [
    startPage('https://x.com/i/flow/login', 'Go to x.com login page'),
    expectUrl('https://x.com/home', 'Log in'),
    notarize('https://api.x.com/1.1/account/settings.json', 'GET', 'Generate Proof of Twitter profile'),
  ],
})
The above snippet defines a Web Proof, which is generated by the following steps:
startPage- redirects the user's browser tohttps://x.com/i/flow/login.expectUrl- ensures that the user is logged in and visitinghttps://x.com/homeURL. The argument passed here is a URL Pattern against which the user browser URL is checked.notarize- prompts the user to generate a Web Proof, i.e. to notarize an HTTPGETrequest sent tohttps://api.x.com/1.1/account/settings.jsonURL. This step works by first capturing the request made by the user's browser to the given URL (which is a URL Pattern against which browser request URLs are matched) and, once captured, the request is sent again, this time notarized.
Each step also accepts a human-readable message which the user will see. We can also optionally pass a link to custom logo to display in the extension.
Once we have a definition of how a Web Proof should be generated we can request it.
import { proverAbi } from './proverAbi'
import { sepolia } from 'viem/chains'

const hash = await vlayer.proveWeb({
    address: '0x70997970c51812dc3a010c7d01b50e0d17dc79c8',
    proverAbi,
    functionName: 'main',
    args: [webProofRequest, '0xd8dA6BF26964aF9D7eEd9e03E53415D37aA96045'],
    chainId: sepolia,
})
The above snippet:
- Opens vlayer browser extension and guides the user through the steps defined above. The Web Proof is generated using vlayer default Notary server and WebSocket proxy (see section WebSocket proxy below for more details).
- Once the Web Proof is successfully generated, it is submitted to Prover contract:
- with address
0x70997970c51812dc3a010c7d01b50e0d17dc79c8, - whose interface is defined by
proverAbi, - calling
functionNamefunction of the contract, - passing the specified
args- the generated Web Proof will be passed as first argument in this example, - executing the method call on prover contract within the context of
chainId.
- with address
To learn more details about the Web Proof feature, please see the Web Proof section.
Low-level API
While the vlayer client method proveWeb described above provides a convenient interface to both the vlayer browser extension and the prover contract, we also provide methods that can access each of them separately.
We can configure a Web Proof provider which uses vlayer browser extension and enables configuring custom Notary server and custom WebSocket proxy (see section WebSocket proxy below for more details).
import { createExtensionWebProofProvider } from '@vlayer/sdk/web_proof'

const webProofProvider = createExtensionWebProofProvider({
    notaryUrl: 'https://...',
    wsProxyUrl: 'wss://...',
})
Both notaryUrl and wsProxyUrl have default values:
notaryUrl:https://test-notary.vlayer.xyzwsProxyUrl:wss://test-wsproxy.vlayer.xyz
Because of these defaults, the provider can be initialized without any additional configuration as follows:
const webProofProvider = createExtensionWebProofProvider();
vlayer hosts a public instance of the TLSN notary server for development, experimentation, and demonstration purposes. Notary server can be also self-hosted using Docker.
In the future, vlayer is planning to provide additional Web Proof provider implementations, which can be e.g. ran server-side and don't require vlayer browser extension for the purpose of Web Proof generation.
The Web Proof provider exposes a low-level API to directly define proverCallCommitment (commitment to use the generated Web Proof only with the specified prover contract call details, so it's not possible to submit it in a different context) and to explicitly generate the Web Proof by calling requestWebProof.
import {
  startPage,
  expectUrl,
  notarize,
} from '@vlayer/sdk/web_proof'

// all args required by prover contract function except webProof itself
const commitmentArgs = ['0xd8dA6BF26964aF9D7eEd9e03E53415D37aA96045']

const proverCallCommitment = {
  address: '0x70997970c51812dc3a010c7d01b50e0d17dc79c8',
  functionName: 'main',
  commitmentArgs,
  chainId: sepolia,
  proverAbi,
}

webProofProvider.requestWebProof({
  proverCallCommitment,
  steps: [
    startPage('https://x.com/i/flow/login', 'Go to x.com login page'),
    expectUrl('https://x.com/home', 'Log in'),
    notarize('https://api.x.com/1.1/account/settings.json', 'GET', 'Generate Proof of Twitter profile', []),
  ],
});

webProofProvider.addEventListeners(
  ExtensionMessageType.ProofDone,
  ({ payload: { presentationJson } }) => {
    const webProof = JSON.stringify({ presentationJson });
    prove(webProof);
  },
);
Once we have the Web Proof available we can directly call vlayer client prove method, adding the Web Proof to previously created proverCallCommitment.
import { sepolia } from 'viem/chains'
import { proverAbi } from './proverAbi'

function prove(webProof) {
  const hash = await vlayer.prove({
      ...proverCallCommitment,
      args: [webProof, ...commitmentArgs],
  })
}
Redaction
The vlayer browser extension supports fine-grained redaction of specific components of HTTPS requests and responses when generating Web Proofs. You can configure redaction using the notarize step.
By default, the transcript is not redacted at all and redaction of each HTTP request/response part needs to be configured to enable redaction.
Header Redaction
You can redact specific headers from both the request and the response. To do so, use request.headers, request.headers_except, response.headers, or response.headers_except with a header name (e.g. Authorization, Cookie). Using headers or headers_except allows you to control which HTTP headers are redacted: either by explicitly specifying the headers to remove, or by redacting all except a given subset.
Redact specific headers
notarize("https://api.example.com/profile", "GET", "Proof", [
  {
    request: {
      headers: ["Authorization", "Cookie"], // redact only these headers
    },
  },
])
Keep only selected headers
notarize("https://api.example.com/profile", "GET", "Proof", [
  {
    request: {
      headers_except: ["User-Agent"], // keep only User-Agent
    },
  },
])
Redact all headers
notarize("https://api.example.com/profile", "GET", "Proof", [
  {
    response: {
      headers_except: [], // redact everything
    },
  },
])
URL Redaction
You can redact specific query parameters from a URL. Use url_query to redact only selected parameters, or url_query_except to redact all parameters except those you specify.
Redact specific queries
notarize("https://api.example.com/profile", "GET", "Proof", [
  {
    request: {
      url_query: ["id"], // redact only "id" query parameter
    },
  },
])
Keep only selected queries
notarize("https://api.example.com/profile", "GET", "Proof", [
  {
    request: {
      url_query_except: ["id"], // keep only the "id" query parameter
    },
  },
])
Keep in mind though that because of the safety reasons (described here), only either the full, unredacted URL or a URL starting with a specified prefix can be verified.
WebSocket proxy
The WebSocket proxy is required in the Web Proofs setup to allow the vlayer extension to access the low-level TLS connection of the HTTPS request for which we are generating a Web Proof (browsers do not provide this access by default). The default WebSocket proxy, wss://test-wsproxy.vlayer.xyz, used in our SDK and hosted by vlayer, supports a limited number of domains.
Currently, the allowed domains are:
x.comandapi.x.comswapi.dev
If you'd like to notarize a request for a different domain, you can run your own proxy server. To do this locally run websockify using Docker:
docker run -p 3003:80 jwnmulder/websockify 80 api.x.com:443
Replace api.x.com with the domain you'd like to use. Then, configure your Web Proof provider to use your local WebSocket proxy (running on port 3003):
import { createExtensionWebProofProvider } from '@vlayer/sdk/web_proof'

const webProofProvider = createExtensionWebProofProvider({
  wsProxyUrl: "ws://localhost:3003",
})
Now the notarized HTTPS request will be routed through your local proxy server.
Getting Started
This documentation walks you through building a complete vlayer Web Proof application deployed to Optimism Sepolia testnet that:
- Proves ownership of a Twitter/X account
- Extracts the Twitter handle from the authenticated API response
- Verifies the proof on-chain (Optimism Sepolia testnet)
- Mints an NFT representing the verified Twitter account
Explore the fullstack demo 🚀
Note: vlayer is configured to work with multiple testnets. See the full list of supported testnets for details on which features are available on each network.
Environment Setup
Step 1: Clone and Navigate
git clone https://github.com/vlayer-xyz/webproof-getting-started
cd webproof-getting-started
Step 2: Install Contract Dependencies
cd contracts
forge soldeer install
forge build
This will:
- Install vlayer SDK (v1.5.1)
- Install OpenZeppelin contracts (v5.0.1)
- Install Forge Standard Library
- Compile all contracts
Step 3: Install Deployment Dependencies
cd contracts/deploy
bun install
Step 4: Configure Environment Variables
Create a .env.testnet.local file in contracts/deploy/:
cd contracts/deploy
touch .env.testnet.local
Add the following content:
# Get this from https://dashboard.vlayer.xyz/
VLAYER_API_TOKEN="your_jwt_token_here"

# Your Ethereum wallet private key (must have Optimism Sepolia ETH)
EXAMPLES_TEST_PRIVATE_KEY="0xYourPrivateKeyHere"
Getting Your vlayer API Token:
- Visit vlayer Dashboard
- Click "Create New Token" and check "Allow domain for webproofs"
- Include the domain you want to prove for:
api.x.com - Paste your
VLAYER_API_TOKENinto.env.testnet.local
Step 5: Deploy Contracts
Deploy to vlayer testnet (Optimism Sepolia):
cd contracts/deploy
bun run deploy:testnet
Expected output:
Deploying contracts...
Prover deployed at: 0x951a2e9612d6ace80ebd82f0f66a087c2932d31d
Verifier deployed at: 0x2462b1347212a4b956fd65a534b17b6a3a086418
Environment variables written to .env
Step 6: Configure Frontend
Copy the generated .env file from contracts/deploy/ to react-frontend/:
cp contracts/deploy/.env react-frontend/.env
Then edit react-frontend/.env to add your credentials:
# Deployed contract addresses (auto-generated)
VITE_PROVER_ADDRESS=0x951a2e9612d6ace80ebd82f0f66a087c2932d31d
VITE_VERIFIER_ADDRESS=0x2462b1347212a4b956fd65a534b17b6a3a086418

# Network configuration (auto-generated)
VITE_CHAIN_NAME=optimismSepolia
VITE_PROVER_URL=https://stable-fake-prover.vlayer.xyz/1.5.1/
VITE_JSON_RPC_URL=https://sepolia.optimism.io
VITE_NOTARY_URL=https://test-notary.vlayer.xyz/v0.1.0-alpha.12
VITE_WS_PROXY_URL=wss://test-wsproxy.vlayer.xyz/jwt
VITE_GAS_LIMIT=5000

# Add these manually:
VITE_EXAMPLES_TEST_PRIVATE_KEY="0xYourPrivateKeyHere"
VITE_VLAYER_API_TOKEN="your_jwt_token_here"
⚠️ Warning: Environment variables prefixed with
VITE_are embedded into your frontend and publicly visible to anyone who accesses your application. Never use a wallet with real funds or your main private key. Create a dedicated test wallet with only testnet ETH for this tutorial.
Step 7: Install and Run Frontend
cd react-frontend
bun install
bun run dev
Visit http://localhost:5173 to see your application running.
Smart Contract Development
The Prover Contract
The prover contract (WebProofProver.sol) is responsible for verifying web proofs and extracting data.
// SPDX-License-Identifier: UNLICENSED
pragma solidity ^0.8.21;

import {Proof} from "vlayer-0.1.0/Proof.sol";
import {Prover} from "vlayer-0.1.0/Prover.sol";
import {Web, WebProof, WebProofLib, WebLib} from "vlayer-0.1.0/WebProof.sol";

contract WebProofProver is Prover {
    using WebProofLib for WebProof;
    using WebLib for Web;

    string public constant DATA_URL =
        "https://api.x.com/1.1/account/settings.json";

    function main(WebProof calldata webProof, address account)
        public
        view
        returns (Proof memory, string memory, address)
    {
        Web memory web = webProof.verifyWithUrlPrefix(DATA_URL);

        string memory screenName = web.jsonGetString("screen_name");

        return (proof(), screenName, account);
    }
}
Understanding the Prover
Key Components:
-
Inheritance from
Prover- Provides access to
proof()function - Enables zero-knowledge proof generation
- Provides access to
-
DATA_URLconstant- Specifies which API endpoint you're proving
- Must match the URL in your frontend web proof request
- Learn how to retrieve the API endpoint you want to prove here
-
mainfunction- Entry point for proof generation
- Takes a
WebProofand useraddressas inputs - Returns a
Proof, extracted data, and the address
-
verifyWithUrlPrefix()- Verifies the web proof signature
- Checks that the notarized URL matches the expected prefix
- Returns a
Webobject containing the verified data
-
jsonGetString()- Extracts a specific field from JSON response
- In this case, gets the
screen_namefrom Twitter's API
Customization Points:
To extract different data, you can use:
// Extract a string
string memory value = web.jsonGetString("field_name");

// Extract a number
uint256 number = web.jsonGetUint("numeric_field");

// Extract from nested JSON
string memory nested = web.jsonGetString("user.profile.bio");
The Verifier Contract
The verifier contract (WebProofVerifier.sol) validates proofs on-chain and executes business logic.
// SPDX-License-Identifier: UNLICENSED
pragma solidity ^0.8.21;

import {WebProofProver} from "./WebProofProver.sol";
import {Proof} from "vlayer-0.1.0/Proof.sol";
import {Verifier} from "vlayer-0.1.0/Verifier.sol";
import {ERC721} from "@openzeppelin-contracts-5.0.1/token/ERC721/ERC721.sol";

contract WebProofVerifier is Verifier, ERC721 {
    address public prover;

    mapping(uint256 => string) public tokenIdToMetadataUri;

    constructor(address _prover) ERC721("TwitterNFT", "TNFT") {
        prover = _prover;
    }

    function verify(Proof calldata, string memory username, address account)
        public
        onlyVerified(prover, WebProofProver.main.selector)
    {
        uint256 tokenId = uint256(keccak256(abi.encodePacked(username)));
        require(_ownerOf(tokenId) == address(0), "User has already minted a TwitterNFT");

        _safeMint(account, tokenId);
        tokenIdToMetadataUri[tokenId] = string.concat(
            "https://faucet.vlayer.xyz/api/xBadgeMeta?handle=",
            username
        );
    }

    function tokenURI(uint256 tokenId) public view override returns (string memory) {
        return tokenIdToMetadataUri[tokenId];
    }
}
Understanding the Verifier
Key Components:
-
Multiple Inheritance
Verifier: Provides proof verification functionalityERC721: Standard NFT implementation
-
onlyVerifiedmodifier- Automatically verifies the zero-knowledge proof
- Ensures the proof was generated by the correct prover contract
- Validates the proof corresponds to the correct function (
main.selector)
-
Proof parameters
- First parameter is always
Proof calldata - Subsequent parameters must match prover's return values (excluding the Proof)
- In this case:
string memory username, address account
- First parameter is always
-
Business Logic
- Creates deterministic token ID from username hash
- Prevents duplicate minting (one NFT per Twitter handle)
- Mints NFT to the proven account owner
- Sets metadata URI dynamically
Frontend Integration
Setting Up the vlayer Client
The frontend integration involves three main steps:
- Creating a Web Proof Provider
- Initializing the vlayer Client
- Creating and executing Web Proof Requests
Step 1: Web Proof Provider
const webProofProvider = createExtensionWebProofProvider();
This creates a provider that interfaces with the vlayer browser extension. The extension will:
- Open when a proof is requested
- Guide the user through the proof generation process
- Capture and notarize web traffic
Step 2: vlayer Client
const vlayer = createVlayerClient({
  url: import.meta.env.VITE_PROVER_URL,
  token: import.meta.env.VITE_VLAYER_API_TOKEN,
  webProofProvider: webProofProvider,
});
The client connects to vlayer's proving infrastructure and authenticates with your API token.
Step 3: Web Proof Request
const webProofRequest = createWebProofRequest({
  steps: [
    startPage('https://x.com/home', 'Go to x.com login page'),
    expectUrl('https://x.com/home', 'Log in'),
    notarize('https://api.x.com/1.1/account/settings.json', 'GET', 'Generate Proof'),
  ],
});
Step Types:
startPage(url, instruction): Opens a URL and displays an instructionexpectUrl(url, instruction): Waits for user to navigate to a specific URLnotarize(url, method, instruction): Captures and notarizes a specific API call
Best Practices:
- Keep instructions clear and user-friendly
- Match the notarize URL to your prover contract's
DATA_URL
Step 4: Generate Proof
const hash = await vlayer.proveWeb({
  address: import.meta.env.VITE_PROVER_ADDRESS,
  proverAbi: WebProofProver.abi,
  functionName: 'main',
  args: [webProofRequest, targetAddress],
  chainId: optimismSepolia.id,
});
This initiates the proving process:
- Opens the browser extension
- User follows the guided steps
- Web traffic is captured and notarized
- Returns a hash to track the proving job
Step 5: Wait for Result
const result = await vlayer.waitForProvingResult({ hash });
This polls the proving service until the zero-knowledge proof is generated. The result contains all the arguments needed to call your verifier contract.
Steps 6-8: On-Chain Verification
These steps use standard Viem patterns to:
- Create wallet clients
- Simulate the transaction (optional but recommended)
- Submit the verification transaction
Conclusion
Congrats! You've built a complete Web Proof application that proves Twitter/X account ownership, extracts authenticated data, and mints NFTs on Optimism Sepolia. You now understand how to create prover contracts that verify web data, verifier contracts that execute on-chain logic, and frontend integrations that guide users through the proof generation process. From here, you can adapt this pattern to prove data from any web API, whether it's verifying GitHub contributions, proving DeFi positions, or authenticating any other web-based credential.
Email proofs from SDK
Email Proofs
In order to prove the content of an email, we firstly need to prepare it to be passed into the smart contract.
We provide a handy function for it in the SDK, preverifyEmail.
import fs from "fs";
import { preverifyEmail } from "@vlayer/sdk";
// .. Import prover contract ABI

// Read the email MIME-encoded file content
const email = fs.readFileSync("email.eml").toString();

// Prepare the email for verification
const unverifiedEmail = await preverifyEmail(email);

// Create vlayer server client
const vlayer = createVlayerClient();

const hash = await vlayer.prove({
  address: prover,
  proverAbi: emailProofProver.abi,
  functionName: "main",
  args: [unverifiedEmail],
  chainId: foundry,
});
const result = await vlayer.waitForProvingResult({ hash });
The email.eml file should be a valid email. Usually it can be exported from your email client.
Prover
vlayer Prover contracts are almost the same as regular Solidity smart contracts, with two main differences:
-
Access to Off-Chain Data:
Provercontracts accept data from multiple sources through features such as time travel, teleport, email proofs, and web proofs. This allows claims to be verified on-chain without exposing all input the data. -
Execution Environment: The
Provercode executes on the vlayer zkEVM, but the proofs of that computation are subsequently verified by the on-chainVerifiercontract. Unlike the on-chain contract, theProverdoes not have access to the current block. It can only access previously mined blocks. Under the hood, vlayer generates zero-knowledge proofs of theProver's execution.
Prover in-depth
Prover parent contract
Any contract function can be run in the vlayer prover, but to access the additional features listed above, the contract should inherit from the Prover contract. Once inherited, any function can act as a proving function. These features are enabled by precompiles available only on the vlayer zkEVM.
Single source of truth
Although the Prover contract runs only on the zkEVM, its code must also be deployed to the same public chain as the Verifier. This is because the vlayer zkEVM operates in stateless mode and fetches the prover contract code directly from the public blockchain.
Arguments and returned value
Arbitrary arguments can be passed to Prover functions. All input arguments are private, meaning they are not visible on-chain; however, they are visible to the prover server.
Returned values are bound to the proof, so the Verifier must always receive both the proof and the returned values from the Prover function in order to validate them correctly.
Proofs are not stored or persisted by vlayer. It is the developer's responsibility to track and manage used proofs within their Verifier contract.
Limits
We impose the following restrictions on the proof:
- Calldata passed into the
Provercannot exceed 5 MB.
Proof
Once the Prover computation is complete, a proof is generated and made available along with the returned value. This output can then be consumed and cryptographically verified by the Verifier on-chain smart contract.
Note that all values returned from Prover functions becomes a public input for on-chain verification. Arguments passed to Prover functions remain private.
The list of returned arguments must match the arguments used by the
Verifier(see the Verifier page for details).vlayer
Provermust return a placeholder proof as the first argument to maintain consistency withVerifierarguments. PlaceholderProofreturned byProveris created by its methodproof(), which is later replaced by the real proof, once it's generated.
Deployment
The Prover contract code must be deployed before use. To do so, just use regular Foundry workflow.
Prepare deployment script:
contract SimpleScript is Script {
    function setUp() public {}

    function run() public {
        uint256 deployerPrivateKey = vm.envUint("DEPLOYER_PRIV");
        vm.startBroadcast(deployerPrivateKey);

        SimpleProver simpleProver = new SimpleProver();
        console2.log("SimpleProver contract deployed to:", address(simpleProver));
    }
}
Local environment
In the separate terminal, run the local Ethereum test node:
anvil
Then save and execute it:
DEPLOYER_PRIV=PRIVATE_KEY forge script path/to/Script.s.sol --rpc-url http://127.0.0.1:8545
The above command deploys the SimpleProver contract code to local network.
If successful, the above command returns the contract address and the Prover is ready for generating proofs.
For production use proper RPC url and encrypt private key instead of using it via plain text
Verifier contract
vlayer provides Verifier smart contracts that allow on-chain verification of computations performed by Prover contracts. To use the output computed by Prover contract, follow the rules covered in the next section.
Proof Verification
Proof verification can be done by any function that uses the onlyVerified modifier and passes arguments in a particular way. We call such a function verification function. See the example below, with verification function claim.
contract Example is Verifier {

    function claim(
      Proof _p,
      address verifiedArg1,
      uint verifiedArg2,
      bytes extraArg
    )
      public
      returns (uint)
      onlyVerified(PROVER_ADDRESS, FUNCTION_SELECTOR)
    {
        //...
    }
}
onlyVerified modifier
The onlyVerified modifier takes two arguments:
Provercontract address- the signature of the
Proverfunction used to generate the proof
Under the hood, onlyVerified reads the submitted Proof and public inputs from msg.data. It ensures that:
- The proof is valid and passes verification
- The public inputs match values returned from
Prover - The proof was created by the specified
Provercontract and the specified function This prevents invalid, tampered, or mismatched proofs from being accepted by the contract.
Proof argument
Passing Proof as the first argument to the verification function is mandatory. Note that even though the proof is not used directly in the body of the verified function, onlyVerified will have access to it via msg.data.
Verified arguments
After the proof, we need to pass verified arguments. Verified arguments are the values returned by the Prover contract function. We need to pass all the arguments returned by prover, in the same order and each of the same type.
See the example below.
contract Prover {

  function p() return (Proof p, address verifiedArg1, uint256 verifiedArg2, bytes32 verifiedArg3) {
    ...
  }
}

contract Verifier {
  function v(Proof _p, address verifiedArg1, uint256 verifiedArg2, bytes32 verifiedArg3)
}
Note: Passing different variables (in terms of type, name, or order) would either revert execution or cause undefined behavior and should be avoided for security reasons.
Extra arguments
Extra arguments can be passed to Verifier by using additional function. This function manages all additional operations connected with extra arguments and then calls the actual verification function.
See the example below:
function f(Proof _p, verifiedArg1, verifiedArg2, extraArg1, extraArg2) {
  ...
  v(_p, verifiedArg1, verifiedArg2);
}
Prover Global Variables
In the global namespace, Solidity provides special variables and functions that primarily offer information about blocks, transactions, and gas.
Since Prover contracts operate in the vlayer zkEVM environment, some variables are either not implemented or behave differently, compared to standard EVM chains.
Current Block and Chain
vlayer extends Solidity with features like time traveling between block numbers and teleporting to other chains. As a result, the values returned by block.number and block.chainId are influenced by these features.
Initially, block.number returns one of the recently mined blocks in the settlement chain, known as the settlement block.
Typically, the prover will use the most recent block. However, proving takes time, and up to 256 blocks can be mined between the start of the proving process and the final on-chain settlement. Proofs for blocks older than 256 blocks will fail to verify. Additionally, a malicious prover might try to manipulate the last block number. Therefore, the guarantee is that the settlement block is no more than 256 blocks old. In the future, the number of blocks allowed to be mined during proving may be significantly increased.
It is recommended to set setBlock to a specific block before making assertions.
Regarding block.chainId, initially it is set to the settlement chain ID, as specified in the JSON RPC call. Later, it can be changed using the setChain() function.
Hashes of Older Blocks
The blockhash(uint blockNumber) function returns the hash for the given blockNumber, but it only works for the 256 most recent blocks. Any block number outside this range returns 0.
vlayer-Specific Implementations
block.number: The current block number, as described in the Current Block and Chain section.block.chainid: The current chain ID, as described in the Current Block and Chain section.blockhash(uint blockNumber): Returns the hash of the given block ifblockNumberis within the 256 most recent blocks; otherwise, it returns zero.block.timestamp: The current block timestamp in seconds since the Unix epoch.msg.sender: Initially set to a fixed address, it behaves like in standard EVM after a call.block.prevrandao: Returns pseudo-random uint, use with caution.block.coinbase(address payable): Returns0x0000000000000000000000000000000000000000.
Behaves the Same as in Solidity
msg.data: The complete calldata, passed by the prover.
Unavailable Variables
block.basefee: Not usable.block.blobbasefee: Not usable.block.difficulty: Not usable.block.gaslimit: Returns 30000000.msg.value: Payable functionalities are unsupported; returns 0.msg.sig: Not usable; does not contain a valid signature.tx.origin: Sender of the transaction (full call chain).blobhash(uint index): Not usable.gasleft: Unused.tx.gasprice: Unused.
Tests
The prover and verifier contracts in vlayer are similar to regular smart contracts, allowing you to perform unit testing using your preferred smart contract testing framework.
vlayer introduces the vlayer test command, along with a couple of cheatcodes, which offers additional support for vlayer specific tests:
- Integration testing involving both the prover and the verifier
- Preparing data for the zkEVM proofs
This command uses Foundry's Forge testing framework, so if you are familiar with it, you will find the process straightforward.
Cheatcodes
To manipulate the blockchain state and test for specific reverts and events, Forge provides cheatcodes.
vlayer introduces additional cheatcodes:
callProver(): Executes the next call within the vlayer zkEVM environment, generating a proof of computation accessible viagetProof.getProof(): Retrieves the proof from the last call after usingcallProver.preverifyEmail(string memory email) returns (UnverifiedEmail memory): Fetches the DNS for the RSA public key used to sign the email.
Similar to some other Forge cheatcodes, like prank or expectEmit, callProver()
must be used before the call to the prover function.
Also note, that majority of the cheatcodes are performing a call under the hood. This means, that if you use a cheatcode, like console.log between callProver() and the prover function call, the proof will be
generated for the console.log call, not for the prover function call.
    // Don't do this
    callProver();
    console.log("this will be proved, instead of prover.main()");
    uint venmoBalance = prover.main();
Another effect of the callProver() is that it effectively disables all the testing specific functions in the next call.
In general, callProver() should only be used if you want to generate a proof for the validation call, as it brings a noticeable overhead to the test.
Differences against Forge
There are a few forge functionalities that are explicitly disabled in the vlayer tests:
- Having
setUp()function in the test contract. Currently, every unit test needs to set up the environment on its own. It's still possible to create a separate function and call it at the beginning of each test. - Watch mode
- Forking the blockchain
Example Usage
import {VTest} from "vlayer-0.1.0/testing/VTest.sol";

contract WebProverTest is VTest {
    WebProver prover;
    WebVerifier verifier;

    function test_mainProver() public {
        callProver(); // The next call will execute in the Prover
        uint venmoBalance = prover.main();
        Proof memory proof = getProof();
        verifier.main(proof, venmoBalance);
    }
}
Running Tests
The vlayer test command searches for all contract tests in the current working directory.
Any contract with an external or public function beginning with test is recognized as a test. By convention, tests should be placed in the test/ directory and should have a .t.sol extension and derive from Test contract.
vlayer specific tests are located in the test/vlayer directory and should derive from the VTest contract, which provides access to additional cheatcodes.
To run all available tests, use the following command:
vlayer test
This command runs both Forge tests and vlayer specific tests.
FAQ & Troubleshooting
Allocating gas error
My mainnet gas balance is below 1M, but enough for a proof. Why am I getting errors:
error: Allocating gas failed with error: Allocating gas: JSON-RPC error: {"code":1003,"message":"Insufficient gas balance"}
Allocating gas failed with error: Your gas balance is insufficient to allocate given gas_limit
Explanation
vlayer zkEVM prover pre-allocates gas before running a proof. It does this using the gasLimit parameter passed to the vlayerClient.prove() call.
If gasLimit is higher than your total balance, allocation fails — even if the actual proof would use less gas.
By default, gasLimit is set to 1_000_000.
If you're using one of our example templates, GAS_LIMIT is an environment variable that overrides this default.
To fix the error, one can reduce gasLimit so it's below your actual balance, but still high enough for the proof to succeed.
Security
vlayer takes security seriously and undergoes regular audits by reputable third-party firms.
Audits
Multisigs
The on-chain Smart Contracts are secured by the industry standard Safe multisigs.
Addresses:
| Network | Address | Explorer Link |
|---|---|---|
| Ethereum | 0xb06DB7A76f861874a2634200029BbE63Af5Be7CC | Etherscan |
| Optimism | 0x6924C300F8b7751f8c1Fa5A14e674A5B519645E1 | Optimistic Etherscan |
| Base | 0xBa8aA379D4Bf594b70Da1C414c5765ebC8223174 | Basescan |
Verifier Smart Contracts
vlayer provides base classes from which the developer derives their own smart contracts.
Note: On testnet, contracts support fake proofs for faster development and testing.
On mainnet, only real Groth16 proofs are valid.
Mainnet Addresses
| Contract | Address |
|---|---|
| Repository | 0xbDf27a6f3CF309F9127d8173d0D28bF9ab35ed2b |
| Groth16ProofVerifier | 0x1EE8a3B907EbcdFc33f76e3C7aAe6FFD2eFA5b73 |
Testnet addresses
| Contract | Address |
|---|---|
| Repository | 0x0cFfdB4e737F00Ef57b4c61dBfBb334B3a416519 |
| Groth16ProofVerifier | 0x9AdE0B5F34402AeFdcBE1a8733d5995Ff827f586 |
| FakeProofVerifier | 0x711B293738290768f3eD1DBf2D00e0f9eEc19E6B |
| ProofVerifierRouter | 0x7925a78734Fc7f2cb69d7E03d81467BB851f9Eb8 |
Contributing
Welcome!
We're excited you're interested in contributing to vlayer repository. Whether you're here to fix bugs, improve the documentation, or suggest a new feature, your contributions make vlayer better for everyone.
This document outlines the process to get involved.
Code of Conduct
To ensure a welcoming and respectful environment, all contributors are expected to follow these guidelines:
- Be respectful and considerate in all interactions.
- Provide constructive feedback and avoid personal attacks.
- Assume good intent and work collaboratively.
- Avoid discriminatory language or behavior.
- Follow the GitHub Community Guidelines.
By participating in this project, you agree to abide by this code of conduct. Let's build something great together!
Getting Started
- Fork the repository on GitHub.
Making a Contribution
We welcome:
- Bug fixes
- Feature implementations
- Performance improvements
- Tests and refactoring
- Documentation updates
Pro tip: Before starting major changes, open an issue or draft PR to discuss with maintainers.
Code Style and Linting
- Keep PRs focused and well-documented.
- Ensure your code passes the lint checks and tests.
- Keep conversations focused, useful, inclusive, and respectful.
Pull Request Process
- Before starting work on an issue, please check for existing work to ensure that it is not already being addressed by someone else.
- If you find an issue you would like to work on, add a comment to it expressing your interest, and a member of the vlayer team will reach out to you for a brief discussion.
- Following the discussion, the vlayer team will formally assign the issue to you, indicating that you are the main contributor working on that particular issue.
- Upon resolving the issue, please submit a Pull Request (PR) with your solution, ensuring that:
- Your PR targets the main branch.
- Your branch is named clearly:
fix/bug-description,feature/feature-name, etc. - Your PR includes a clear description i.e. What changes were made? Why are they necessary? Any open questions or assumptions.
- Link related issues using issue labels.
- Next, submit your PR and wait for a member of the vlayer team to review. The review process includes checking that the solution passes all necessary tests and effectively resolves the issue. If your contribution meets this criteria, we will merge it into the project.
- Throughout the process, be responsive to feedback and open to suggestions
Contributing to the Documentation
We welcome and encourage contributions to the vlayer documentation! You can help improve it in several impactful ways:
- Enhancing clarity and readability by rephrasing confusing sections or updating outdated content.
- Fixing typos, grammar, or formatting errors to ensure a smooth reading experience.
- Creating new guides or tutorials that you wish you had when getting started—chances are others will find them helpful too.
- Translating documentation into other languages to make vlayer more accessible to a global audience.
For detailed instructions on how to contribute to the vlayer docs, please refer to our documentation contribution guide.
Get in Touch
- Join our Discord for real-time chat.
- Follow us on X/Twitter for updates.
- Email: [email protected]
License
vlayer v1.0 uses a dual licensing model, in which vlayer Labs Ltd. (core contributor of vlayer) is designated for commercialization, while the code is licensed to the general public under Business Source License (BSL) 1.1, which shall convert to the permissive MIT license after three years.
This approach ensures that our technology remains accessible for broad community innovation, initially protecting project integrity while ultimately supporting widespread collaboration and adoption by developers across the globe.
By contributing, you agree that your contributions will be licensed under the Business Source License (BSL) 1.1.
Next steps
Looking to make your first contribution? Here are some key areas where you can get involved with vlayer:
- Rust: contribute to vlayer Rust codebase
- JavaScript: contribute to vlayer JS/TS codebase
- Book: update content, or provide feedback to this book
- Upgrading Risc0: step-by-step guide to upgrading Risc0 dependency
- JWT: learn how to generate valid tokens
Contributing to vlayer Rust codebase
Prerequisites
To start working with this repository, you will need to install following software:
- Rust compiler
- Risc-0 toolchain with VM version v3.0.3 and Rust toolchain version v1.85.0
curl -L https://risczero.com/install | bash export PATH=$PATH:~/.risc/bin rzup install r0vm 3.0.3 rzup install rust 1.85.0 - Foundry
- Bun and Node.js
- LLVM Clang compiler version which supports RISC-V build target available on the
PATH timeoutterminal command
Homebrew
If you're on macOS, you can use Homebrew to install some of the dependencies:
LLVM
brew install llvm
After installation, make sure to follow the instructions to update your PATH.
coretils
brew install coreutils
Building vlayer
In this guide, we will focus on running examples/simple example.
Build solidity smart contracts
First, make sure the dependencies are up-to-date:
git submodule update --init --recursive
Next, navigate to contracts/vlayer directory, and run:
cd contracts/vlayer
forge soldeer install
Build vlayer proving server
To build the project, first, navigate to the rust directory and run:
cd rust
cargo build
Build JS/TS SDK
Navigate to packages directory and run:
cd packages
bun install
Next, navigate to packages/sdk directory and run:
cd packages/sdk
bun run build
Running example
Run Anvil
Open a new terminal and run:
anvil
Run vlayer proving server
Open a new terminal, navigate to rust directory and run:
VLAYER_RPC_URLS="31337:http://localhost:8545" RUST_LOG=info cargo run --bin call_server
Build example contracts
Finally, to test proving navigate to examples/simple directory, and run following commands to build example's contracts:
forge soldeer install
forge clean
forge build
Next, navigate to vlayer directory, and run the following command:
bun install
bun run prove:dev
For guides about the project structure, check out architecture appendix.
Guest Profiling
To profile execution of Guest code in zkVM, we leverage the profiling functionality provided by RISC Zero. In order to run profiling, follow the steps in the Usage section of the RISC Zero documentation, but in Step 2 replace the command you run with:
RISC0_PPROF_OUT=./profile.pb cargo run --bin call_server
which will start the vlayer server. Then just call the JSON RPC API and the server will write the profiling output to profile.pb, which can be later visualised as explained in the RISC Zero Profiling Guide. Please note that the profile only contains data about the Guest execution, i.e. the execution inside the zkVM.
Working with guest ELF IDs
Dockerized guest builds ensure that guest ELF IDs remain deterministic. This process is managed by the build script in the rust/guest_wrapper crate, which relies on the build-utils crate. Current and historical chain guest IDs are stored in the repository to maintain consistency when calling host and guest functions (see Repository Artifacts below).
Generating ImageID.sol
The guest wrapper's build script generates the file target/assets/ImageID.sol, which is symlinked to contracts/vlayer/src/ImageID.sol.
If contract compilation fails due to a missing ImageID.sol, run:
cargo build
Additionally, remember to recompile contracts after rebuilding the guest.
Running end-to-end tests
To run end-to-end tests with real chain workers, a dockerized build must be completed in advance. This is done by compiling with:
RISC0_USE_DOCKER=1 cargo build
This process typically takes 4-5 minutes on a MacBook Pro (using Apple Virtualization with Rosetta for amd64 emulation).
Handling Chain guest ELF ID mismatch errors
If a dockerized build fails with a Chain guest ELF ID mismatch error, it means the chain guest has changed, and the ELF ID must be updated. To resolve this, re-run the build with:
RISC0_USE_DOCKER=1 UPDATE_GUEST_ELF_ID=1 cargo build
This will:
- Move the previous chain guest ELF ID to the historical IDs file,
- Put the new chain guest ELF ID (generated during the compilation) into the file with current ELF ID,
- Generate a TODO changelog entry, which should be consequently filled in with change description by the person introducing the change.
Repository artifacts
/rust/guest_wrapper/artifacts/chain/elf_id– single-line text file with hex-encoded ELF ID of the current chain guest. No trailing newline./rust/guest_wrapper/artifacts/chain/elf_id_history– multi-line text file with all historical chain guest IDs, hex-encoded, one ID per line, sorted from oldest to newest, initially empty./rust/guest_wrapper/artifacts/chain/CHANGELOG.md– markdown file where every chain guest ID (including current one) is annotated with creation date and a list of changes.
Troubleshooting
Error on macOS while cargo build: assert.h file doesn't exist
In some cases while running cargo build, an error occurs with compiling mdbx-sys.
In that case install xcode-select:
xcode-select --install
If you get the message Command line tools are already installed, but the problem persists, reinstall it:
sudo rm -rf /Library/Developer/CommandLineTools
xcode-select --install
Then, install updates by "Software Update" in System Settings and finally restart your computer.
Contributing to vlayer JavaScript codebase
Prerequisites
To start working with this repository, you will need to install following software:
- Bun JavaScript runtime.
Bumping version
- Apply changes to the code
- Run
bun changeset - Submit information about your changes (would be visible in the changelog)
- Run
bun changeset version - Commit modified files changes
- Push
Quick list of common questions to get you started engaging with changesets (tool for versioning) is in their docs
Troubleshooting
Hanging SDK tests
If you see the following when trying to run SDK unit tests
$ cd packages/sdk
$ bun run test:unit
 vitest --run

 RUN  v2.1.4 /Users/kubkon/dev/vlayer/vlayer/packages/sdk
and nothing happening for a longer while, make sure you have Node.js installed.
bun install hung on resolving dependencies
If you see bun install hung on resolving dependencies in any of our examples, for instance
$ vlayer init --template simple
$ cd vlayer
$ bun install
Resolving dependencies
disable Bun's global cache by either using bunfig.toml as described here
[install.cache]
disable = true
disableManifest = true
or by directly passing a CLI flag
$ bun install --no-cache
There is a long-standing bug in Bun that despite many attempts at fixing is still present in all versions: issue #5831: Bun install hangs sporadically
Contributing to vlayer Book
Prerequisites
Ensure you have Rust and the Cargo package manager installed:
curl --proto '=https' --tlsv1.2 -sSf https://sh.rustup.rs | sh
After installing Rust, install the required dependencies:
mdbook: A command-line tool for creating books with Markdown.mdbook-mermaid: A preprocessor for compiling Mermaid diagrams.mdbook-tabs: A plugin for adding tab functionality to the book.
cargo install mdbook mdbook-mermaid mdbook-tabs
Development
The book's source is in the vlayer monorepo. To start the development server, navigate to the book/ directory and run:
mdbook serve
Whenever you update the book's source, the preview will automatically refresh. Access the preview at http://localhost:3000.
Building
To build the book, navigate to the book/ directory and run:
mdbook build
Building
Rust allows you to set granular log levels for different crates using RUST_LOG. To debug a specific crate, you can set its log level to debug. For example:
RUST_LOG=info,call_engine=debug ./target/debug/call_server
The static HTML output will be generated in the book/book directory. You can use this output to preview the book locally or deploy it to a static site hosting service.
Upgrading Risc0
There are 4 parts to this process:
- upgrading r0vm and rust toolchain,
- upgrading Rust cargo dependencies,
- upgrading Risc0 Ethereum contracts, and
- generating new Guest ID using Docker.
Deciding which parts need updating will mainly depend if Risc0 has issued a patch, minor or major version bump. Quite naturally, a major version bump will require updating all 4 parts, however minor or patch will most likely require updating toolchain and Rust cargo dependencies, and generating a new Guest ID using Docker.
In what follows, all paths are relative to the project's root.
Please note the upgrade process should be done in the order specified below.
Upgrade r0vm and rust toolchain
- Risc0 action -
.github/actions/risc0/action.yml
inputs:
  version:
    description: 'Version of r0vm to install'
    default: 2.0.0 # bump r0vm version which usually corresponds to overall risc0 version
    required: false
  rust_version:
    description: 'Version of Rust toolchain for building guest images'
    default: 1.81.0 # bump Rust toolchain version which usually changes very rarely
    required: false
- Ansible config for deployed provers -
ansible/group_vars/all.yml
vlayer_risc0_version: '2.0.0'
- Post-release test scripts -
bash/test-release-local-prover.shandbash/test-release-remote-prover.sh
echo "::group::risczero installation"
curl -L https://risczero.com/install | bash
export PATH="$PATH:~/.risc0/bin"
export PATH="$PATH:~/.cargo/bin"
rzup install r0vm 2.0.0
rzup install rust 1.81.0
rzup show
echo "::endgroup::"
- Dockerfiles -
docker/call_server/Dockerfileanddocker/chain_worker/Dockerfile
RUN curl -L https://github.com/risc0/risc0/releases/download/v2.0.0/cargo-risczero-x86_64-unknown-linux-gnu.tgz -o cargo-risczero-x86_64-unknown-linux-gnu.tgz
- Nix flake -
nix/risc0.nix
This is a two-step process. First, change/add new Risc0 release like so:
let
releases = {
  "2.0.0" = {
    "aarch64-darwin" = {
      arch = "aarch64-apple-darwin";
      hash = pkgs.lib.fakeHash;
    };
  };
  # rest of the file
};
in
rec {
  default = risc0."2.0.0";
  inherit (package "2.0.0") "2.0.0";
  # rest of the file
}
Next, run from the project root and get the actual hash value for the new package:
$ nix develop
error: hash mismatch in fixed-output derivation '/nix/store/z82gnv3n7z1js3s33zrnq25kafdl82pk-cargo-risczero-aarch64-apple-darwin.tgz.drv':
         specified: sha256-AAAAAAAAAAAAAAAAAAAAAAAAAAAAAAAAAAAAAAAAAAA=
            got:    sha256-d/gQVXK+WAPTGRnx8Fw3XTWe6oKPw8FsLK7VNxC9aF8=
error: 1 dependencies of derivation '/nix/store/z45x6ixixxi6wrvsg29p9r8g6p2546qy-cargo-risczero-v2.0.0.drv' failed to build
error: 1 dependencies of derivation '/nix/store/nl0wkkhzm2zh7f0n6cmd2s7ismc5bm33-vlayer-env.drv' failed to build
And copy the actual hash value (got in the snippet above) into nix/risc0.nix file:
let
releases = {
  "2.0.0" = {
    "aarch64-darwin" = {
      arch = "aarch64-apple-darwin";
      hash = "sha256-d/gQVXK+WAPTGRnx8Fw3XTWe6oKPw8FsLK7VNxC9aF8=";
    };
  };
  # rest of the file
- Update Risc0 requirements in the book in /appendix/contributing/rust.md
Upgrade Rust cargo dependencies
In this step of the upgrade process, as with any version bump of a Rust dependency, it may so happen that just a bump is not enough and API usage needs to be updated too. Bear that in mind when updating and experiencing compilation errors.
- Main project manifest -
Cargo.toml
We leave out risc0-build-ethereum unless there was a major Risc0 version bump that forced Ethereum contracts update, in which case
we will come back to it in the next step of the upgrade process.
# ...
risc0-build = "=2.0.1";
risc0-build-ethereum = { git = "https://github.com/vlayer-xyz/risc0-ethereum.git", rev = "12f4a76616bdc31108fc585c4a0ce7ebd97059fd" }
risc0-zkp = { version = "=2.0.0", default-features = false }
risc0-zkvm = "=2.0.0"
bonsai-sdk = "=1.4.0"
- Guests manifests -
rust/guest_wrapper/risc0_call_guest/Cargo.tomlandrust/guest_wrapper/risc0_chain_guest/Cargo.toml
# ...
risc0-zkvm = { version = "=2.0.0", default-features = false, features = ["std", "unstable"] }
risc0-zkvm-platform = { version = "=2.0.1", features = [ "rust-runtime", "export-getrandom", "sys-getenv" ] }
- Risc0 VM benchmarks -
rust/zkvm-benchmarks/runner/risc0_guest/Cargo.toml
# ...
risc0-zkvm = { version = "=2.0.0", default-features = false, features = ["std", "unstable"] }
(Optional) Upgrade Risc0 Ethereum contracts
If there was a major version bump, the project is likely failing with a compilation error when trying to build risc0-build-ethereum
crate. In this case, you will need to upgrade our risc0-ethereum fork to the desired Risc0 release version.
- Upgrade
risc0-ethereumrepo
Clone risc0-ethereum repo. You will notice that each significant Risc0 version bump
has a matching branch with our changes, for instance release-1.2-soldeer or release-2.0-soldeer. We will do the same for this release.
1.1. Create new release branch
git checkout main
git checkout -b release-2.0-soldeer
1.2. Sync with Risc0 release
git remote add upstream [email protected]:risc0/risc0-ethereum
git fetch upstream
git checkout v2.0.0 # or whatever Risc0 has tagged the release as
1.3. Configure soldeer and remove submodules
See commit a5613d1c for an illustrative example.
1.3.1. Update .gitignore
Add the following line anywhere in .gitignore
# ...
contracts/dependencies/
1.3.2. Update Foundry config - contracts/foundry.toml
Point libs at ./dependencies and add [dependencies] header as the last header in the manifest
# ...
libs = ["./dependencies"]

# ...

[dependencies]

# See more config options https://book.getfoundry.sh/static/config.default.toml
1.3.3. Remove git submodules
$ git rm -f lib/forge-std lib/openzeppelin-contracts
1.4. Add soldeer dependencies
See commit ab6aaa37 for an illustrative example.
1.4.1. Add dependencies to manifest - contracts/foundry.toml
[dependencies]
forge-std = "1.9.4"
"@openzeppelin-contracts" = "5.1.0"
1.4.2. Tweak the remappings - contracts/remappings.txt
forge-std/=dependencies/forge-std-1.9.4/src
openzeppelin-contracts=dependencies/@openzeppelin-contracts-5.1.0/
1.4.3. Pull the dependencies from soldeer registry and commit the lock file
$ cd contracts
$ forge soldeer install
$ git add soldeer.lock
$ git commit
1.5. Refactor remappings in contracts
We need to tweak every contract that imports openzeppelin-contracts to import it as openzeppelin-contracts/...
rather than openzeppelin/contracts/....
For example, take contracts/src/RiscZeroSetVerifier.sol
// ...
import {MerkleProof} from "openzeppelin-contracts/utils/cryptography/MerkleProof.sol";
// ...
See commit cf3d1381 for an illustrative example.
1.6. Pack contracts using soldeer
Packing contracts is equivalent to publishing the contracts with --dry-run flag on in soldeer lingo
$ forge soldeer push risc0-ethereum~2.0.0 contracts --dry-run
This command will generate contracts/contracts.zip that we will need in the next step.
1.7. Create GitHub release
Finally, create GitHub release by first tagging the branch and then uploading contracts/contracts.zip.
$ git tag v2.0.0-soldeer
$ git push origin tag v2.0.0-soldeer
1.8. Update Risc0 Ethereum contracts in the main repo
Now, let's circle back to the main repo (vlayer). We will need to propagate the new version of Solidity contracts in a few places.
1.8.1. Update main Cargo manifest - Cargo.toml
risc0-build-ethereum = { git = "https://github.com/vlayer-xyz/risc0-ethereum.git", rev = "cf3d1381f076f1094455a0fc6ebd5bd172424d09" }
Here the revision hash corresponds to the commit hash which we tagged in the risc0-ethereum repo.
1.8.2. Update foundry manifest - contracts/vlayer/foundry.toml
risc0-ethereum = { version = "2.0.0", url = "https://github.com/vlayer-xyz/risc0-ethereum/releases/download/v2.0.0-soldeer/contracts.zip" }
Note that the url should point to the zipped contracts we just created a GitHub release for in risc0-ethereum repo.
1.8.3. Update remappings - contracts/vlayer/remappings.txt and contracts/fixtures/remappings.txt
risc0-ethereum-2.0.0/=../vlayer/dependencies/risc0-ethereum-2.0.0/
1.8.4. Update vlayer-init config - bash/lib/e2e.sh and rust/cli/config.toml
[sol-dependencies.risc0-ethereum]
version = '2.0.0'
url = "https://github.com/vlayer-xyz/risc0-ethereum/releases/download/v2.0.0-soldeer/contracts.zip"
remappings = [["risc0-ethereum-2.0.0/", "dependencies/risc0-ethereum-2.0.0/"]]
1.8.5. Update imports in contracts
Change any risc0-ethereum import to the correct version.
1.8.6. Update Groth16 verifier selector - contracts/vlayer/test/helpers/Groth16VerifierSelector.sol and rust/services/call/seal/src/lib.rs
The new selector value can be extracted from risc0-ethereum/contracts/src/selector.rs
and in particular, from the enum Selector. For example, v2.0 selector is tagged as Selector::Groth16V2_0 = 0x9f39696c.
Having noted this value down, we can now update the contracts and the seal:
library Groth16VerifierSelector {
    // value ensures that versions of risc0-ethereum and risc0-zkvm deps are compatible
    // must be kept in-sync with GROTH16_VERIFIER_SELECTOR value in rust/services/call/seal/src/lib.rs
    bytes4 public constant STABLE_VERIFIER_SELECTOR = bytes4(0x9f39696c);
}
#![allow(unused)]
fn main() {
    // stable, expected selector by solidity groth16 verifiers
    // must be kept in sync with value from `contracts/vlayer/test/helpers/Groth16VerifierSelector.sol`
    const GROTH16_VERIFIER_SELECTOR: VerifierSelector = VerifierSelector([0x9f, 0x39, 0x69, 0x6c]);
}
1.8.7. Fix Solidity integration tests - contracts/vlayer/test/integration/ProofVerifier.t.sol
Values that will require updating are:
FIXED_CALL_GUEST_IDFIXED_GROTH16_SETTLE_BLOCK_HASHFIXED_FAKE_SETTLE_BLOCK_HASHsealBytesinfakeProofFixture()sealBytesingroth16ProofFixture
Obtaining those new values requires running e2e-test.sh on simple example and copying the values from the generated proof.
- Fake values
Run the following e2e test:
$ EXAMPLE=simple ./bash/e2e-test.sh
The values we are looking for can be matched in the output using the following blueprint:
Proof result: [
  {
    seal: {
      verifierSelector: "0xdeafbeef",
      seal: [ "sealBytes[0]",
        "0x0000000000000000000000000000000000000000000000000000000000000000", "0x0000000000000000000000000000000000000000000000000000000000000000",
        "0x0000000000000000000000000000000000000000000000000000000000000000", "0x0000000000000000000000000000000000000000000000000000000000000000",
        "0x0000000000000000000000000000000000000000000000000000000000000000", "0x0000000000000000000000000000000000000000000000000000000000000000",
        "0x0000000000000000000000000000000000000000000000000000000000000000"
      ],
      mode: 1,
    },
    callGuestId: "FIXED_CALL_GUEST_ID",
    length: 768,
    callAssumptions: {
      proverContractAddress: "0x9fe46736679d2d9a65f0992f2272de9f3c7fa6e0",
      functionSelector: "0xe3d670d7",
      settleChainId: "0x7a69",
      settleBlockNumber: "0x6",
      settleBlockHash: "FIXED_FAKE_SETTLE_BLOCK_HASH",
    },
  },
  "0xf39Fd6e51aad88F6F4ce6aB8827279cffFb92266", 10000000n
]
- Groth16 values
Tweak bash/run_services/lib.sh so that startup_vlayer() always runs using remote Groth16 (Bonsai) prover:
function startup_vlayer() {
  local proof_arg="groth16";
  # ...
}
Next, execute e2e test with Bonsai credentials:
$ EXAMPLE=simple BONSAI_API_URL=https://api.bonsai.xyz BONSAI_API_KEY=... ./bash/e2e-test.sh
The values we are looking for can be matched as follows from the output:
Proof result: [
  {
    seal: {
      verifierSelector: "0x9f39696c",
      seal: [ "sealBytes[0]",
        "sealBytes[1]", "sealBytes[2]",
        "sealBytes[3]", "sealBytes[4]",
        "sealBytes[4]", "sealBytes[5]",
        "sealBytes[6]"
      ],
      mode: 0,
    },
    callGuestId: "FIXED_CALL_GUEST_ID",
    length: 768,
    callAssumptions: {
      proverContractAddress: "0x9fe46736679d2d9a65f0992f2272de9f3c7fa6e0",
      functionSelector: "0xe3d670d7",
      settleChainId: "0x7a69",
      settleBlockNumber: "0x6",
      settleBlockHash: "FIXED_GROTH16_SETTLE_BLOCK_HASH",
    },
  },
  "0xf39Fd6e51aad88F6F4ce6aB8827279cffFb92266", 10000000n
]
1.8.8. Fix Solidity stable deployment tests - contracts/vlayer/src/TestnetStableDeployment.sol and contracts/vlayer/src/MainnetStableDeployment.sol
If any of the stable deployment tests failed, e.g., contracts/vlayer/test/integration/TestnetStableDeployment.t.sol or contracts/vlayer/test/integration/MainnetStableDeployment.t.sol,
you will need to update contracts addresses with the correct value. While doing this, it is best to update one address at a time, and re-run the tests.
In order to repro the failures locally, run from the project root:
cd contracts/vlayer
rm -rf cache dependencies out
forge soldeer install
FOUNDRY_PROFILE=no-vlayer ../../target/debug/vlayer test --match-path test/integration/MainnetStableDeployment.t.sol
(For testnet it goes analogically but we match path test/integration/TestnetStableDeployment.t.sol instead.)
A typical failing run may look as follows:
Ran 4 tests for test/integration/TestnetStableDeployment.t.sol:StableTestDeployment_Tests
[FAIL: assertion failed: 0x2ECf3470326735703bb6a36f1e33A2999216C5B7 != 0x0aa99BBDB44591B4D17a45F7050349A7C768d116] test_FakeProofVerifierAddressIsStable() (gas: 7045)
[FAIL: assertion failed: 0xCD6C658fD7cD35daC0e9c2Ec6E11fd051f766568 != 0x7E231CfC3e3B549633D5AD61C30f07Dd4d408ad3] test_groth16ProofVerifierAddressIsStable() (gas: 11960)
[FAIL: assertion failed: 0xb820A089b4c5bC8BBf4021FB9637Ff598DaB2E69 != 0xE574dd2E0048A9e44d3EC946B78d4dFcfF52600e] test_proofVerifierRouterIsStable() (gas: 5088)
[FAIL: assertion failed: NEW_ADDRESS != 0xc4E4dC291A5C4dEbe9Ff5a3372F3FdD2e42Bac86] test_repositoryAddressIsStable() (gas: 6547)
Suite result: FAILED. 0 passed; 4 failed; 0 skipped; finished in 15.39ms (28.10ms CPU time)

Ran 1 test suite in 139.41ms (15.39ms CPU time): 0 tests passed, 4 failed, 0 skipped (4 total tests)
In this case, we substitute the addresses one-by-one, re-running the test after each swap-out, with the correct values:
// contracts/vlayer/src/TesnetStableDeployment.sol
// SPDX-License-Identifier: UNLICENSED
pragma solidity ^0.8.21;

import {Repository} from "./Repository.sol";
import {FakeProofVerifier} from "./proof_verifier/FakeProofVerifier.sol";
import {Groth16ProofVerifier} from "./proof_verifier/Groth16ProofVerifier.sol";
import {ProofVerifierRouter} from "./proof_verifier/ProofVerifierRouter.sol";

library TestnetStableDeployment {
    function repository() internal pure returns (Repository) {
        return Repository(address(NEW_ADDRESS));
    }

    function verifiers() internal pure returns (FakeProofVerifier, Groth16ProofVerifier, ProofVerifierRouter) {
        FakeProofVerifier fakeProofVerifier = FakeProofVerifier(address(0xeF2f0Cbb90821E1C5C46CE5283c82F802F65a3f3));
        Groth16ProofVerifier groth16ProofVerifier =
            Groth16ProofVerifier(address(0x074Fc67dA733FFA5B288a9d5755552e61a1A0a06));
        ProofVerifierRouter proofVerifierRouter =
            ProofVerifierRouter(address(0x7d441696a6F095B3Cd5e144ccBCDB507e0ce124e));

        return (fakeProofVerifier, groth16ProofVerifier, proofVerifierRouter);
    }
}
When updating MainnetStableDeployment.sol addresses, you also have to update the address tested in test_returnsAConstantForMainnets() test in contracts/vlayer/test/proof_verifier/ProofVerifierFactory.t.sol:
// contracts/vlayer/test/proof_verifier/ProofVerifierFactory.t.sol
// ...
function test_returnsAConstantForMainnets() public {
    vm.chainId(1);

    IProofVerifier verifier = ProofVerifierFactory.produce();
    assert(verifier == IProofVerifier(address(GROTH16_ADDRESS)));
}
// contracts/vlayer/src/MainnetStableDeployment.sol
// SPDX-License-Identifier: UNLICENSED
pragma solidity ^0.8.21;

import {Repository} from "./Repository.sol";
import {Groth16ProofVerifier} from "./proof_verifier/Groth16ProofVerifier.sol";

library MainnetStableDeployment {
    function repository() internal pure returns (Repository) {
        return Repository(address(0x42fc5CdBfA5E4699C0e1e0adD0c4BC421d80482F));
    }

    function verifiers() internal pure returns (Groth16ProofVerifier) {
        Groth16ProofVerifier groth16ProofVerifier =
            Groth16ProofVerifier(address(GROTH16_ADDRESS));

        return (groth16ProofVerifier);
    }
}
Generate new Guest ID using Docker
Make sure all previous steps have been performed successfully.
- Generate new GuestID using Docker
$ UPDATE_GUEST_ELF_ID=1 RISC0_USE_DOCKER=1 cargo build
Go and get yourself a cup of coffee or something - this will take a while.
- Update the CHANGELOG with the name of the change -
rust/guest_wrapper/artifacts/chain_guest/CHANGELOG.md
# ...
* `<a_new_guest_id_value> - TODO`
replace TODO with an actual reason for an upgrade.
Clearing the history of chain GuestIDs
If the history of supported chain GuestIDs needs to be cleared (e.g. because of a vulnerability), perform the following:
-
Clear the
rust/guest_wrapper/artifacts/chain_guest/elf_id_historyfile. -
Run the GuestID generation method:
UPDATE_GUEST_ELF_ID=1 SKIP_CURRENT_GUEST_ELF_ID_FROM_HISTORY=1 RISC0_USE_DOCKER=1 cargo build
- Clear and update the changelog with only the newly generated GuestId -
rust/guest_wrapper/artifacts/chain_guest/CHANGELOG.md
JSON Web Tokens
Authentication with vlayer services is handled via JSON Web Tokens (JWTs). Since JWTs are Base64-encoded by default, it can be difficult to visually inspect them when debugging failed authentication attempts.
For most use cases, generating a JWT through the dashboard is sufficient. However, for local development or debugging, the vlayer CLI includes a helpful utility for generating and verifying JWTs compatible with the vlayer network.
This utility is available under the vlayer jwt command.
Generating/encoding new JWTs
Generating new JWTs can be done using vlayer jwt encode command.
Typical usage when targeting vlayer devnet would look as follows:
$ vlayer jwt encode -p docker/fixtures/jwt-authority.key --subject deadbeef --host "api.x.com" --port 443
2025-03-28T06:47:46.993637Z  INFO vlayer::commands::jwt: Claims {
    host: "api.x.com",
    port: 443,
    exp: 18446744073709551615,
    sub: "deadbeef",
}
2025-03-28T06:47:47.002804Z  INFO vlayer::commands::jwt: eyJ0eXAiOiJKV1QiLCJhbGciOiJSUzI1NiJ9.eyJob3N0IjoiYXBpLnguY29tIiwicG9ydCI6NDQzLCJleHAiOjE4NDQ2NzQ0MDczNzA5NTUxNjE1LCJzdWIiOiJkZWFkYmVlZiJ9.EPvz_8kHV1FW3SObjzmyN_WOCbmQvBNHHDsjMYd0M__lbfpeDUJinM8vLJ4KLYpo_nqEBipq4rl656pImXPNHKpmyrjWaEueG5bNY67Vyxa7A8B7jHkqnVpFe7L5kX-5M-kC-8JLxmlsNAMhm40vrmiC3uqFqnFAiXxefV-usnlGgnLMZSWfo5PwRFhayEsObHCJImsj5tKIUUS1d2dDzwRhBmrAIvOihbvAVnSQsrHTMxfs2-OsUQjRkDfEsBhz46Ei1fBRFoAj0-SQH04YBaWkQlNqStXOL2n_2eQyUnAJH_5sn7lSmXQLPhUlNHdh2Ly8DJ6qcZpGEoM1fKXL7nOIay5pEThGPqAZGiXL3yMt-E550EX_ccvTIYzSBqZ671Q4ziy1acNIWBsL5abm-Rui-crQHSXAH6q8ADQCEdMZT6jw6XeNxt-AQIh_GduVlIALoZBYrfsJi8MfcWsYwQ36TAzp67Wb7LmqXGWfVv0_XSNLjFMc-WGqTk195jfY-Sb8v11opF7BKEW1sH89ALCGX0dWMTablAzox8eKwawEZWmL0xEXQwqARqJD20EnWW6tZ3X8LV5JAVNhAfM6Yp9wJ_BWJmlN_5P7F6ODy_nTlr5tJ5yLpX2OLRQQrsIyRB-Y4VdH8K5riIIOPcjapXtIoqEaFNmkls5hX_3jzKk
Here we are generating a new JWT token with subject equal deadbeef and web-proof target host api.x.com:443.
We are also employing the default devnet private key to correctly sign the token stored at docker/fixtures/jwt-authority.key.
Validating/decoding JWTs
Validating JWTs can be done using vlayer jwt decode command.
Decoding tokens that were signed using vlayer devnet's default private key would look as follows:
$ vlayer jwt decode -p docker/fixtures/jwt-authority.key.pub eyJ0eXAiOiJKV1QiLCJhbGciOiJSUzI1NiJ9.eyJob3N0IjoiYXBpLnguY29tIiwicG9ydCI6NDQzLCJleHAiOjE4NDQ2NzQ0MDczNzA5NTUxNjE1LCJzdWIiOiJkZWFkYmVlZiJ9.EPvz_8kHV1FW3SObjzmyN_WOCbmQvBNHHDsjMYd0M__lbfpeDUJinM8vLJ4KLYpo_nqEBipq4rl656pImXPNHKpmyrjWaEueG5bNY67Vyxa7A8B7jHkqnVpFe7L5kX-5M-kC-8JLxmlsNAMhm40vrmiC3uqFqnFAiXxefV-usnlGgnLMZSWfo5PwRFhayEsObHCJImsj5tKIUUS1d2dDzwRhBmrAIvOihbvAVnSQsrHTMxfs2-OsUQjRkDfEsBhz46Ei1fBRFoAj0-SQH04YBaWkQlNqStXOL2n_2eQyUnAJH_5sn7lSmXQLPhUlNHdh2Ly8DJ6qcZpGEoM1fKXL7nOIay5pEThGPqAZGiXL3yMt-E550EX_ccvTIYzSBqZ671Q4ziy1acNIWBsL5abm-Rui-crQHSXAH6q8ADQCEdMZT6jw6XeNxt-AQIh_GduVlIALoZBYrfsJi8MfcWsYwQ36TAzp67Wb7LmqXGWfVv0_XSNLjFMc-WGqTk195jfY-Sb8v11opF7BKEW1sH89ALCGX0dWMTablAzox8eKwawEZWmL0xEXQwqARqJD20EnWW6tZ3X8LV5JAVNhAfM6Yp9wJ_BWJmlN_5P7F6ODy_nTlr5tJ5yLpX2OLRQQrsIyRB-Y4VdH8K5riIIOPcjapXtIoqEaFNmkls5hX_3jzKk
2025-03-28T06:48:59.290970Z  INFO vlayer::commands::jwt: Header {
    typ: Some(
        "JWT",
    ),
    alg: RS256,
    cty: None,
    jku: None,
    jwk: None,
    kid: None,
    x5u: None,
    x5c: None,
    x5t: None,
    x5t_s256: None,
}
2025-03-28T06:48:59.292317Z  INFO vlayer::commands::jwt: Claims {
    host: "api.x.com",
    port: 443,
    exp: 18446744073709551615,
    sub: "deadbeef",
}
Architecture overview
vlayer execution spans across three environments, each written in respective technologies and consisting of related components:
- browser (js)
- javascript SDK - thin wrapper around the vlayer JSON-RPC API
- browser plugin - used for notarization of TLS Connections
- server infrastructure (rust)
- prover server - exposing vlayer functionality via vlayer JSON-RPC API
- chain proof cache - http server used as a cache for proofs of inclusion of a block in a chain
- TLS Notary server - used to notarize TLS connections
- DNS Notary server - used to notarize DKIM DNS records
- workers - used to perform actual proving
- blockchain (Solidity)
- on-chain smart contracts - used to verify proofs

All the above components can be found in the monorepo. It also contains sources of this book.
Call Prover architecture
vlayer enables three key functionalities: accessing different sources of verifiable data, aggregating this data in a verifiable way to obtain verifiable result and using the verifiable result on-chain.
It supports accessing verifiable data from three distinct sources: HTTP requests, emails and EVM state and storage. For each source, a proof of validity can be generated:
- HTTP requests can be verified using a Web Proof, which includes information about the TLS session, a transcript of the HTTP request and response signed by a TLS Notary
- Email contents can be proven by verifying DKIM signatures and checking the sender domain
- EVM state and storage proofs can be verified against the block hash via Merkle Proofs
Before vlayer, ZK programs were application-specific and proved a single source of data. vlayer allows you to write a Solidity smart contract (called Prover) that acts as a glue between all three possible data sources and enables you to aggregate this data in a verifiable way - we not only prove that the data we use is valid but also that it was processed correctly by the Prover.
Aggregation examples
- Prover computing average ERC20 balance of addresses
- Prover returning true if someone starred a GitHub Org by verifying a Web Proof
Note: Despite being named "Prover", the Prover contract does not compute the proof itself. Instead, it is executed inside the zkEVM, which produces the proof of the correctness of its execution.
Call Proof is a proof that we correctly executed the Prover smart contract and got the given result.
It can be later verified by a deployed Verifier contract to use the verifiable result on-chain.
But how are Call Proofs obtained?
Call Prover
To obtain Call Proofs, the Call Prover is used. It is a Rust server that exposes the v_call JSON-RPC endpoint. The three key components of the prover are the Guest, Host, and Engine. The Guest executes code within the zkEVM to generate a proof of execution. The Host prepares the necessary data and sends it to the Guest. The Engine, responsible for executing the EVM, runs in both the Guest and Host environments.
Their structure and responsibilities are as follows:
- Guest: Performs execution of the code inside zkEVM. Consists of three crates:
guest(inservices/call/guest): Library that contains code for EVM execution and input validation.risc0_guest(inguest_wrapper/risc0_call_guest): Thin wrapper that uses RISC0 ZKVM I/O and delegates work toguest.guest_wrapper(inguest_wrapper): Compilesrisc0_guest(using cargo build scripts) to a binary format (ELF) using RISC Zero target.
- Host (in
services/call/host): Runs a preflight, during which it collects all the data required by the guest. It retrieves data from online sources (RPC clients) and then triggers guest execution (which is done offline). - Engine (in
services/call/engine): Sets up and executes the EVM, which executesProversmart contract (including calling custom Precompiles). It executes exactly the same code in preflight and Guest execution.
Our architecture is heavily inspired by RISC Zero steel.
Currently, the Guest is compiled with Risc0, but we aim to build vendor-lock free solutions working on multiple zk stacks, like sp-1 or Jolt.
Runtime configuration
Call Prover can be configured either from a config.toml file, or via environment variables.
TOML
When configuring the prover from the config file, you can pass it via --config-file flag:
$ call_server --config-file config.toml
Valid keys for different configuration options are shown in an example TOML file below:
host = "127.0.0.1"
port = 3000
proof_mode = "fake"
log_format = "plain" # Optional log format to use: [plain, json], defaults to plain

# Optional list of RPC urls for different chains.
# If empty, defaults to Anvil: 31337:http://localhost:8545
[[rpc_urls]]
chain_id = 31337
url = "http://localhost:8545"

[[rpc_urls]]
chain_id = 31338
url = "http://localhost:8546"

# Optional chain client config
[chain_client]
url = "http://localhost:3001"
poll_interval = 5 # Optional polling interval in seconds
timeout = 240 # Optional timeout in seconds

# Optional JWT-based authentication config.
[auth.jwt]
public_key = "/path/to/signing/key.pem"
algorithm = "rs256" # Signing algorithm to use, defaults to rs256

# Optional list of user-defined JWT claims
[[auth.jwt.claims]]
name = "sub" # Specifying just the name of the claim will assert the claims existence with any value

[[auth.jwt.claims]]
name = "environment"
values = ["test"] # `environment` can only accept a single value: `test`

# Optional gas-meter integration for billing and usage tracking
[gas_meter]
url = "http://localhost:3002"
api_key = "deadbeef"
time_to_live = 3600 # Optional time-to-live for gas meter requests in seconds
A few comments about different configuration options:
host- address to useport- port to bind toproof_mode- possible values are eitherfake(default) for fake proofs, orgroth16for production proofs on Risc0 Bonsailog_format- optional log format to use eitherplain(default) orjsonrpc_urls- optional list of chain RPC urls for the prover to use, defaults to Anvil if not set (31337:http://localhost:8545)chain_client- optional chain client config (usually used with time-travel and teleport)auth- optional auth module which currently supports only JWT modeauth.jwt- optional JWT auth configgas_meter- optional gas meter config (usually used internally for billing and usage tracking)
Environment variables
If using a config.toml is undesirable, the prover can also be configured using defaults with environment variables overrides. Every config option can be overridden.
We use VLAYER_ prefix, and nesting of config options is represented using __. Current up-to-date table of environment variables overrides is as follows:
| Environment variable | Config option | Default | Type | Values |
|---|---|---|---|---|
VLAYER_HOST | host | "127.0.0.1" | string | |
VLAYER_PORT | port | 3000 | u16 | 0-65535 |
VLAYER_PROOF_MODE | proof_mode | "fake" | enum | "fake","groth16" |
VLAYER_LOG_FORMAT | log_format | "plain" | enum | "plain","json" |
VLAYER_RPC_URLS | rpc_urls | "31337:http://localhost:8545" | list | |
VLAYER_CHAIN_CLIENT__URL | chain_client.url | "http://localhost:3001" | string | |
VLAYER_CHAIN_CLIENT__POLL_INTERVAL | chain_client.poll_interval | 5 | usize | |
VLAYER_CHAIN_CLIENT__TIMEOUT | chain_client.timeout | 240 | usize | |
VLAYER_AUTH__JWT__PUBLIC_KEY | auth.jwt.public_key | "/path/to/signing/key.pem" | string | |
VLAYER_AUTH__JWT__ALGORITHM | auth.jwt.algorithm | "rs256" | enum | "rs256","rs384","rs512" |
| "es256","es384","ps256" | ||||
| "ps384","ps512","eddsa" | ||||
VLAYER_AUTH__JWT__CLAIMS | auth.jwt.claims | [] | list | |
VLAYER_GAS_METER__URL | gas_meter.url | "http://localhost:3002" | string | |
VLAYER_GAS_METER__API_KEY | gas_meter.api_key | "deadbeef" | string | |
VLAYER_GAS_METER__TIME_TO_LIVE | gas_meter.time_to_live | 3600 | usize |
Execution and proving
The Host passes arguments to the Guest via standard input (stdin), and similarly, the Guest returns values via standard output (stdout). zkVM works in isolation, without access to a disk or network.
On the other hand, when executing Solidity code in the Guest, it needs access to the Ethereum state and storage. The state consist of Ethereum accounts (i.e. balances, contracts code and nonces) and the storage consist of smart contract variables. Hence, all the state and storage needs to be passed via input.
However, all input should be considered insecure. Therefore, validity of all the state and storage needs to be proven.
Note: In off-chain execution, the notion of the current block doesn't exist, hence we always access Ethereum at a specific historical block. The block number doesn't have to be the latest mined block available on the network. This is different than the current block inside on-chain execution, which can access the state at the moment of execution of the given transaction.
To deliver all necessary proofs, the following steps are performed:
- In preflight, we execute Solidity code on the host. Each time the database is called, the value is fetched via Ethereum JSON RPC and the proof is stored in it. This database is called
ProofDb - Serialized content of
ProofDbis passed via stdin to theguest guestdeserializes content into aStateDb- Validity of the data gathered during the preflight is verified in
guest - Solidity code is executed inside revm using
StateDb
Since that Solidity execution is deterministic, database in the guest has exactly the data it requires.

Databases
revm requires us to provide a DB which implements DatabaseRef trait (i.e. can be asked about accounts, storage, block hashes).
It's a common pattern to compose databases to orthogonalize the implementation.
We have Host and Guest databases
- Host - runs
CacheDB<ProofDb<ProviderDb>>:ProviderDb- queries Ethereum RPC Provider (i.e. Alchemy, Infura, Anvil);ProofDb- records all queries aggregates them and collects EIP1186 (eth_getProof) proofs;CacheDB- stores trusted seed data to minimize the number of RPC requests. We seed caller account and some Optimism system accounts.
- Guest - runs
CacheDB<WrapStateDb<StateDb>>:StateDbconsists of state passed from the host and has only the content required to be used by deterministic execution of the Solidity code in the guest. Data in theStateDbis stored as sparse Merkle Patricia Tries, hence access to accounts and storage serves as verification of state and storage proofs;WrapStateDbis an adapter forStateDbthat implementsDatabasetrait. It additionally does caching of the accounts, for querying storage, so that the account is only fetched once for multiple storage queries;CacheDB- has the same seed data as it's Host version.
EvmEnv and EvmInput
vlayer enables aggregating data from multiple blocks and multiple chains. We call these features Time Travel and Teleport. To achieve that, we span multiple revm instances during Engine execution. Each revm instance corresponds to a certain block number on a certain chain.
EvmEnv struct represents a configuration required to create a revm instance. Depending on the context, it might be instantiated with ProofDB (Host) or WrapStateDB (Guest).
It is also implicitly parameterized via dynamic dispatch by the Header type, which may differ for various hard forks or networks.
#![allow(unused)]
fn main() {
pub struct EvmEnv<DB> {
    pub db: DB,
    pub header: Box<dyn EvmBlockHeader>,
    ...
}
}
The serializable input we pass between host and guest is called EvmInput. EvmEnv can be obtained from it.
#![allow(unused)]
fn main() {
pub struct EvmInput {
    pub header: Box<dyn EvmBlockHeader>,
    pub state_trie: MerkleTrie,
    pub storage_tries: Vec<MerkleTrie>,
    pub contracts: Vec<Bytes>,
    pub ancestors: Vec<Box<dyn EvmBlockHeader>>,
}
}
Because we may have multiple blocks and chains, we also have structs MultiEvmInput and MultiEvmEnv, mapping ExecutionLocations to EvmInputs or EvmEnvs equivalently.
#![allow(unused)]
fn main() {
pub struct ExecutionLocation {
    pub chain_id: ChainId,
    pub block_tag: BlockTag,
}
}
CachedEvmEnv
EvmEnv instances are accessed in both Host and Guest using CachedEvmEnv structure. However, the way CachedEvmEnv is constructed differs between these two contexts.
Structure
#![allow(unused)]
fn main() {
pub struct CachedEvmEnv<D: RevmDB> {
    cache: MultiEvmEnv<D>,
    factory: Mutex<Box<dyn EvmEnvFactory<D>>>,
}
}
- cache:
HashMap(aliased asMultiEvmEnv<D>) that storesEvmEnvinstances, keyed by theirExecutionLocation - factory: used to create new
EvmEnvinstances
On Host
On Host, CachedEvmEnv is created using from_factory function. It initializes CachedEvmEnv with an empty cache and a factory of type HostEvmEnvFactory that is responsible for creating EvmEnv instances.
#![allow(unused)]
fn main() {
pub(crate) struct HostEvmEnvFactory {
    providers: CachedMultiProvider,
}
}
HostEvmEnvFactory uses a CachedMultiProvider to fetch necessary data (such as block headers) and create new EvmEnv instances on demand.
On Guest
On Guest, CachedEvmEnv is created using from_envs. This function takes a pre-populated cache of EvmEnv instances (created on Host) and initializes the factory field with NullEvmEnvFactory.
NullEvmEnvFactory is a dummy implementation that returns an error when its create method is called. This is acceptable because, in Guest context, there is no need to create new environments — only the cached ones are used.
Verifying data
Guest is required to verify all data provided by the Host. Initial validation of its coherence is done in two places:
-
multi_evm_input.assert_coherencyverifies:- Equality of subsequent
ancestorblock hashes - Equality of
header.state_rootand actualstate_root
- Equality of subsequent
-
When we create
StateDbin Guest withStateDb::new, we compute hashes forstorage_triesroots andcontractscode. When we later try to access storage (using theWrapStateDb::basic_reffunction) or contract code (using theWrapStateDb::code_by_hash_reffunction), we know this data is valid because the hashes were computed properly. If they weren't, we wouldn't be able to access the given storage or code. Thus, storage verification is done indirectly.
Above verifications are not enough to ensure validity of Time Travel (achieved by Chain Proofs) and Teleport. Travel call verification is described in the next section.
Precompiles
As shown in the diagram in the Execution and Proving section, the Engine executes the EVM, which in turn runs the Solidity Prover smart contract. During execution, the contract may call custom precompiles available within the vlayer zkEVM, enabling various advanced features.
The list, configuration, and addresses of these precompiles are defined in services/call/precompiles. These precompiles can be easily accessed within Solidity Prover contracts using libraries included in the vlayer Solidity smart contracts package.
Available precompiles and their functionality
-
WebProof.verify(viaWebProofLib):
Verifies aWebProofand returns aWebobject containing:body(HTTP response body)notaryPubKey(TLS Notary’s public key that signed the Web Proof)url(URL of the HTTP request)
See Web Proof for details.
-
Web.jsonGetString,Web.jsonGetInt,Web.jsonGetBool,Web.jsonGetFloatAsInt(viaWebLib):
Parses JSON from an HTTP response body (Web.body).
See JSON Parsing for more information. -
UnverifiedEmail.verify(viaEmailProofLib):
Verifies anUnverifiedEmailand returns aVerifiedEmailobject containing:from(sender's email address)to(recipient's email address)subject(email subject)body(email body)
See Email Proof.
-
string.capture,string.match(viaRegexLib):
Performs regex operations on strings.See Regular Expressions.
-
string.test(viaURLPatternLib):
Used withinWebProof.verifyto validateWeb.urlagainst a given URL pattern.See Web Proof.
Error handling
Error handling is done via HostError enum type, which is converted into http code and a human-readable string by the server.
Instead of returning a result, to handle errors, Guest panics. It does need to panic with a human-readable error, which should be converted on Host to a semantic HostError type. As execution on Guest is deterministic and should never fail after a successful preflight, the panic message should be informative for developers.
Time Travel and Teleport
vlayer allows seamless aggregation of data from different blocks and chains. We refer to these capabilities as Time Travel and Teleport. How is it done?
Note: Teleportation is currently possible only from L1 chains to L2 optimistic chains. We plan to support teleportation from L2 to L1 in the future.
Verification
At the beginning of the guest::main we verify whether the data for each execution location is coherent. However, we have not yet checked whether data from multiple execution locations align with each other. Specifically, we need to ensure that:
- The blocks we claim to be on the same chain are actually there (allowing time travel between blocks on the same chain).
- The blocks associated with a given chain truly belong to that chain (enabling teleportation to the specified chain).
The points above are verified by the Verifier::verify function. The Verifier struct is used both during the host preflight and guest execution. Because of that it is parametrized by Recording Clients (in host) and Reading Clients (in guest).
The verify function performs above verifications by:
I. Time Travel Verification
Is possible thanks to Chain Proofs. Verification steps are as follows:
- Retrieve Blocks: Extract the list of blocks to be verified and group them by chain.
- Iterate Over Chains: For each chain run time travel
verifyfunction on its blocks. - Skip Single-Block Cases: If only one block exists, no verification is needed.
- Request Chain Proof: Fetch cryptographic proof of chain integrity.
- Verifies Chain Proof: Run the chain proof
verifyfunction on the obtained Chain Proof to check its validity. - Validate Blocks: Compare each block’s hash with the hash obtained by block number from the validated Chain Proof.
II. Teleport Verification
- Identify Destination Chains: Extract execution locations from
CachedEvmEnv, filtering for chains different from the starting one. - Skip Local Testnets: If the source chain is a local testnet, teleport verification is skipped.
- Validate Chain Anchors: Ensure the destination chain is properly anchored to the source chain using
assert_anchor(). - Fetch Latest Confirmed L2 Block: Use the
AnchorStateRegistryandsequencer_clientto get the latest confirmed block on the destination chain. - Verify Latest Confirmed Block Hash Consistency: Compare the latest confirmed block’s hashes.
- Verify Latest Teleport Location Is Confirmed: Using function
ensure_latest_teleport_location_is_confirmedwe check that latest destination block number is not greater than latest confirmed block number.
Verifier Safety & Testability
To prevent unauthorized custom verifier implementations, we use Sealed trait pattern. This ensures that IVerifier trait cannot be implemented outside the file it was defined - except when the testing feature is enabled.
This design is crucial because verifiers are composable. When testing a Verifier that is composed from other verifiers, we need to mock them with fake implementations. This flexibility is achieved by allowing special implementations under the testing feature.
Macros Overview
The following macros work together to enforce sealing and enable test mocking:
sealed_trait!- Creates a private module (seal) containing a traitSealed. By requiring verifier traits to extendseal::Sealed, only types that also implement Sealed (and hence are defined within controlled environment) can implement the verifier traits.verifier_trait!- Defines the actual verifier trait (e.g.,IVerifier) with a verify method. The trait extendsseal::Sealed.impl_verifier_for_fn!- Allows functions to be used as verifiers by implementing the verifier trait for them. This is only enabled in testing (or when thetestingfeature is turned on).impl_sealed_for_fn!- Implements theSealedtrait for functions with the appropriate signature.sealed_with_test_mock!- This is a convenience macro that ties everything together. It:- Calls
sealed_trait!to create theSealedtrait - Calls
impl_sealed_for_fn!to allow function pointers to be sealed - Defines verifier trait using
verifier_trait! - Implements the verifier trait for function pointers with
impl_verifier_for_fn!
- Calls
Inspector
Both Time Travel and Teleport features are made possible by the Inspector struct, a custom implementation of the Inspector trait from REVM. Its purpose is to handle travel calls that alter the execution context by switching the blockchain network or block number.
How does it work? When ExecutionLocation is updated, Inspector:
- Creates a separate EVM with new
ExecutionLocationcontext (usingtransaction_callbackfunction passed as argument). - Executes the subcall on a separate inner EVM with updated location.
#![allow(unused)]
fn main() {
pub struct Inspector<'a> {
    start_chain_id: ChainId,
    pub location: Option<ExecutionLocation>,
    transaction_callback: Box<TransactionCallback<'a>>,
    metadata: Vec<Metadata>,
}
}
Key Responsibilities of the Inspector
1. Tracks Execution Context (Chain & Block Info)
It maintains the ExecutionLocation which consists of chain_id and block_number
2. Handles Travel Calls
There are two special functions that modify execution context:
set_block(block_number): Updates the block number while keeping the same chain.set_chain(chain_id, block_number): Changes both the blockchain network and block number.
3. Intercepts Contract Calls
Intercepts every contract call and determines how to handle it:
- Precompiled Contracts: If the call targets a precompiled contract, it logs the call and records relevant metadata.
- Travel Call Contract: If the call is directed to the designated travel call contract (identified by
CONTRACT_ADDR), theInspectorparses the input arguments and triggers a travel call by invoking eitherset_blockorset_chain. - Standard Calls: If no travel call is detected, the
Inspectorallows the call to proceed normally. However, if a travel call has already set a new context, it is processed using the providedtransaction_callbackand applies the updated execution context in theon_callfunction.
4. Monitors & Logs Precompiled Contracts
If the call is made to a precompiled contract it logs the call and records metadata.
Precompiles used by vlayer are listed here.
ExecutionResult to CallOutcome conversion
ExecutionResult and CallOutcome are revm structs used in the Inspector code. They are necessary to make travel calls work.
ExecutionResultis an enum representing the complete outcome of a transaction. It has three variants—Success,Revert, andHalt—and includes transaction information such as gas usage, gas refunds, logs, and output data.CallOutcomeis a struct representing the result of a single call within the EVM interpreter. It encapsulates anInterpreterResult(which contains output data and gas usage) along with amemory_offset(the range in memory where the output data is located).
Most fields stored in ExecutionResult have equivalents in CallOutcome. The only exceptions arelogs and gas_refunded fields from ExecutionResult::Success, which do not exist in CallOutcome. Conversely, CallOutcome includes memory_offset, which has no direct counterpart in ExecutionResult.
When Inspector::call is executed, it must return a CallOutcome. However, the transaction_callback run inside Inspector::call executes the full EVM and returns an ExecutionResult. Hence, the conversion between the two is needed.
This conversion is performed using the execution_result_to_call_outcome function within Inspector::on_call. During this process logs and gas_refunded fields from ExecutionResult::Success are discarded, as they are not required in CallOutcome. memory_offset is obtained from CallInputs, which is also passed to execution_result_to_call_outcome as an argument.
Executor
Executor struct handles running EVM transactions. Inspector is created by the Executor struct and used while building EVM.
#![allow(unused)]
fn main() {
pub struct Executor<'envs, D: RevmDB> {
    envs: &'envs CachedEvmEnv<D>,
}
}
call
The Executor provides a public call method that runs the internal execution (internal_call).
internal_call
The private internal_call method performs the core execution of an EVM transaction, including support for recursive internal calls (when one smart contract calls another). In this implementation, the envs are shared across recursive calls, meaning that any modification performed by one call is visible to others.
But updates to the database state (contained in the ProofDb structure, being a part of env) are safe because the state is modified only by inserting new entries. New keys are added to the accounts, contracts, and block_hash_numbers collections, while existing entries remain unchanged.
Error handling
Due to the design of revm's Inspector trait, the Inspector::call (run inside EVM build in Executor::internal_call) method must return an Option<CallOutcome> rather than a Result. This limitation means that errors occurring during intercepted calls cannot be directly propagated via the return type.
To work around this constraint, our Inspector implementation uses panics to signal errors. The panic is then caught in the Executor::call method using panic::catch_unwind. This mechanism allows us to convert panics into proper error results, ensuring that errors are not lost, even though the Inspector::call function itself cannot return an error.
On-chain Verification
When the proving process begins, a specific block is selected as the settlement block—the block we commit to. Then, a call to the Prover contract is executed within zkEVM environment. The guest proof is valid providing the block and contract assumptions used during its generation are accurate.
These assumptions are encapsulated in a dedicated struct used within the guest code:
struct CallAssumptions {
    address proverContractAddress;
    bytes4 functionSelector;
    uint256 settleBlockNumber;
    bytes32 settleBlockHash;
}
The struct is created inside the guest::main function. Since the guest itself cannot independently prove the validity of these assumptions, they must be verified externally.
To achieve this, CallAssumptions is included in the GuestOutput and subsequently verified on-chain using the Verifier contract, specifically through the _verifyExecutionEnv. This verification ensures that the proof aligns with a valid blockchain state.
Validation Steps in _verifyExecutionEnv
The _verifyExecutionEnv function checks the following:
- Prover Contract Validation: Ensures that the proof comes from the correct
proverContractAddress. - Function Selector Validation: Verifies that the function being executed matches the expected function selector.
- Block Number Validation: Ensures that the proof is based on a past block (not from the future) and that the block falls within the last 256 blocks—the maximum number of historical blocks accessible during EVM execution.
- Block Hash Validation: Confirms that the
settleBlockHashmatches the actual on-chain block hash at thesettleBlockNumber.
vlayer provides time-travel functionality. It allows changing the block number of the execution location and accessing the blockchain state at the given block. It is made possible by Chain Proofs.
Chain Proof
vlayer executes Solidity code off-chain and proves the correctness of that execution on-chain. For that purpose, it fetches state and storage data and verifies it with storage proofs.
Storage proofs prove that a piece of storage is part of a block with a specific hash. We say the storage proof is 'connected' to a certain block hash.
However, the storage proof doesn't guarantee that the block with the specific hash actually exists on the chain. This verification needs to be done later with an on-chain smart contract.
Motivation
vlayer provides time-travel functionality. As a result, state and storage proofs are not connected to a single block hash, but to multiple block hashes. To ensure that all those hashes exist on the chain, it's enough to prove two things:
- Coherence - all the blocks' hashes belong to the same chain
- Canonicity - the last block hash is a member of a canonical chain

Coherence
Will be proven using Chain Proof Cache service.
It maintains a data structure that stores block hashes along with a zk-proof. The zk-proof proves that all the hashes contained by the data structure belong to the same chain.
Canonicity
Since the latest hash needs to be verified on-chain, but generating proofs is a slow process; some fast chains might prune our latest block by the time we are ready to settle the proof. Proposed solution is described here.
Proving Coherence
Naive Chain Proof Cache
We need a way to prove that a set of hashes belongs to the same chain. A naive way to do this is to hash all of the subsequent blocks, from the oldest to the most recent, and then verify that each block hash is equal to the parentHash value of the following block. If all the hashes from our set appear along the way, then they all belong to the same chain.
See the diagram below for a visual representation.

Unfortunately, this is a slow process, especially if the blocks are far apart on the time scale. Fortunately, with the help of Chain Proof Cache, this process can be sped up to logarithmic time.
Chain Proof Cache
The Chain Proof Cache service maintains two things:
- a Chain Proof Cache structure (a Merkle Patricia Trie) that stores block hashes,
- a zk-proof 𝜋 that all these hashes belong to the same chain.
Given these two elements, it is easy to prove that a set of hashes belongs to the same chain.
- It needs to be verified that all the hashes are part of the Chain Proof Cache structure.
- 𝜋 needs to be verified.
Chain Proof Cache (BPC) structure
The Chain Proof Cache structure is a dictionary that stores a <block_number, block_hash> mapping. It is implemented using a Merkle Patricia Trie. This enables us to prove that a set of hashes is part of the structure (point 1 from the previous paragraph) by supplying their corresponding Merkle proofs.

Adding hashes to the BPC structure and maintaining 𝜋
At all times, the BPC structure stores a sequence of consecutive block hashes that form a chain. In other words, we preserve the invariant that:
- block numbers contained in the structure form a sequence of consecutive natural numbers,
- for every pair of block numbers
i, i+1contained in the structure,block(i + 1).parentHash = hash(block(i)).
Every time a block is added, 𝜋 is updated. To prove that after adding a new block, all the blocks in the BPC structure belong to the same chain, two things must be done:
- The previous 𝜋 must be verified.
- It must be ensured that the hash of the new block 'links' to either the oldest or the most recent block.
Recursive proofs
In an ideal world - ZK Circuit will have access to its own ELF ID and therefore be able to verify the proofs produces by its previous invocations recursively. Unfortunately because ELF ID is a hash of a binary - it can't be included in itself.
Therefore, we extract ELF ID into an argument and "pipe" it through all the proofs. We also add it to an output. Finally - when verifying this proof within the call proof - we check ELF ID against a hard-coded constant. This can be done there as call and chain are different circuits and having an ID of one within the other does not present the cycle mentioned above.
We can reason about soundness backwards. If someone provided the proof which has correct ELF ID in the output and verifies with correct ELF ID - it also had correct ELF ID in the inputs and therefore correctly verified the internal proof.
If one would try to generate the proof with ELF ID for an empty circuit (no assertions) - they can do that but:
- either the output will not match;
- or the proof will not verify with our ELF ID.
Implementation
Guest code exposes two functions:
initialize()- Initializes the MPT and inserts first block;append_and_prepend()- Extends the MPT inserting new blocks from the right and from the left while checking invariants and verifying previous proofs. In order to understand it's logic - we first explain in pseudocode how would a single append and a single prepend work before jumping into batch implementation.
Initialize
The initialize() function is used to create Chain Proof Cache structure as a Merkle Patricia Trie (MPT) and insert the initial block hash into it. It takes the following arguments:
- elf_id: a hash of the guest binary.
- block: the block header of the block to be added.
It calculates the hash of the block using the keccak256 function on the RLP-encoded block. Then it inserts this hash into the MPT at the position corresponding to the block number. Notice that no invariants about neighbours are checked as there are no neighbours yet.
fn initialize(elf_id: Hash, block: BlockHeader) -> (MptRoot, elf_id) {
    let block_hash = keccak256(rlp(block));
    let mpt = new SparseMpt();
    mpt.insert(block.number, block_hash);
    (mpt.root, elf_id)
}
Append
The append() function is used to add a most recent block to the Merkle Patricia Trie. It takes the following arguments:
- elf_id: a hash of the guest binary,
- new_rightmost_block: the block header to be added,
- mpt: a sparse MPT containing two paths: one from the root to the parent block and one from the root to the node where the new block will be inserted,
- proof (π): a zero-knowledge proof that all contained hashes so far belong to the same chain. This function ensures that the new block correctly follows the previous block by checking the parent block's hash. If everything is correct, it inserts the new block's hash into the trie.
fn append(elf_id: Hash, new_rightmost_block: BlockHeader, mpt: SparseMpt<ParentBlockIdx, NewBlockIdx>, proof: ZkProof) -> (MptRoot, elf_id) {
    risc0_std::verify_zk_proof(proof, (mpt.root, elf_id), elf_id);
    let parent_block_idx = new_rightmost_block.number - 1;
    let parent_block_hash = mpt.get(parent_block_idx);
    assert_eq(parent_block_hash, new_rightmost_block.parent_hash, "Block hash mismatch");
    let block_hash = keccak256(rlp(new_rightmost_block));
    let new_mpt = mpt.insert(new_rightmost_block.number, block_hash);
    (new_mpt.root, elf_id)
}
Prepend
The prepend() function is used to add a new oldest block to the Merkle Patricia Trie. It takes the following arguments:
- elf_id: a hash of the guest binary.
- old_leftmost_block: the full data of the currently oldest block already stored in the MPT.
- mpt: a sparse MPT containing the path from the root to the child block and the new block's intended position.
- proof: a zero-knowledge proof that all contained hashes so far belong to the same chain.
The function verifies the proof to ensure the full data from the child block fits the MPT we have so far. If the verification succeeds, it takes the
parent_hashfrom the currently oldest block and inserts it with the corresponding number into the MPT. Note that we don't need to pass the full parent block as the trie only store hashes. However, we will need to pass it next time we want to prepend.
fn prepend(elf_id: Hash, old_leftmost_block: BlockHeader, mpt: SparseMpt<ChildBlockIdx, NewBlockIdx>, proof: ZkProof) -> (MptRoot, elf_id) {
    risc0_std::verify_zk_proof(proof, (mpt.root, elf_id), elf_id);
    let old_leftmost_block_hash = mpt.get(old_leftmost_block.number);
    assert_eq(old_leftmost_block_hash, keccak256(rlp(old_leftmost_block)), "Block hash mismatch");
    let new_mpt = mpt.insert(old_leftmost_block.number - 1, old_leftmost_block.parent_hash);
    (new_mpt.root, elf_id)
}
Batch version
In order to save on proving costs and latency - we don't expose singular versions of append and prepend but instead - a batch version. It checks the ZK proof only once at the beginning. The rest is the same.
fn append(mpt: SparseMpt, new_rightmost_block: BlockHeader) -> SparseMpt {
    let parent_block_idx = new_rightmost_block.number - 1;
    let parent_block_hash = mpt.get(parent_block_idx);
    assert_eq(parent_block_hash, new_rightmost_block.parent_hash, "Block hash mismatch");
    let block_hash = keccak256(rlp(new_rightmost_block));
    let new_mpt = mpt.insert(new_rightmost_block.number, block_hash);
    new_mpt
}

fn prepend(mpt: SparseMpt, old_leftmost_block: BlockHeader) -> SparseMpt {
    let old_leftmost_block_hash = mpt.get(old_leftmost_block.number);
    assert_eq(old_leftmost_block_hash, keccak256(rlp(old_leftmost_block)), "Block hash mismatch");
    let new_mpt = mpt.insert(old_leftmost_block.number - 1, old_leftmost_block.parent_hash);
    new_mpt
}

fn append_prepend(
  elf_id: Hash,
  prepend_blocks: [BlockHeader],
  append_blocks: [BlockHeader],
  old_leftmost_block: BlockHeader,
  mpt: SparseMpt<[NewLeft..OldLeft], [OldRight...NewRight]>,
  proof: ZkProof
) -> (MptRoot, elf_id) {
    risc0_std::verify_zk_proof(proof, (mpt.root, elf_id), elf_id);
    for block in append_blocks {
      mpt = append(mpt, block);
    }
    for block in prepend_blocks.reverse() {
      mpt = prepend(mpt, old_leftmost_block);
      old_leftmost_block = block
    }
    (new_mpt.root, elf_id)
}
Prove Chain server
Chain Proof Cache structure is stored in a distinct type of vlayer node, specifically a JSON-RPC server. It consists of a single call v_getChainProof(chain_id: number, block_numbers: number[]).
Diagram
%%{init: {'theme':'dark'}}%%
classDiagram
    namespace DB {
        class MDBX {
          // Unit tests
        }

        class InMemoryDatabase {
        }

        class Database {
            <<Interface>>
        }

      class MerkleProofBuilder {
        build_proof(root, key) Proof
      }

      class ChainDB {
          // Unit tests using InMemoryDatabase
          get_chain_info(id) ChainInfo
          get_sparse_merkle_trie(root, [block_num]) MerkleTrie
          update_chain(id, chain_info, new_nodes, removed_nodes)
      }

      class ChainInfo {
        BlockNum left
        BlockNum right
        Hash root
        ZK proof
      }
    }

    namespace ZKVM {
      class MerkleTrie {
          // Unit tests
          get(key) Value
          insert(key, value)
      }

      class BlockTrie {
          // Does not check ZK proofs
          // Unit test for each assertion
          MerkleTrie trie

          new(trie)
          init(block)
          append(new_rightmost_block)
          prepend(old_leftmost_block)
      }

      class Guest {
          init(elf_id, block) (elf_id, Hash)
          append_prepend(elf_id, mpt, old_leftmost, new_leftmost, new_rightmost)
      }
    }

    class Host {
        // Checks that BlockTrie and Guest returned the same root hash
        // Integration tests
        poll()
    }

    class Server {
        // E2E tests
        v_getChainProof(id, [block_num]) [ZkProof, SparseMerkleTrie]
    }

    namespace Providers {
      class Provider {
        <<Interface>>
        get_block(number/hash)
        get_latest_block()
      }

      class EthersProvider {
      }

      class MockProvider {
        mock(request, response)
      }
    }

    Provider <|-- EthersProvider
    Provider <|-- MockProvider

    class Worker {
      // E2E test on Temp MDBX and anvil
    }

    Database <|-- MDBX
    Database <|-- InMemoryDatabase
    ChainDB --> Database
    ChainDB --> MerkleProofBuilder
    ChainDB -- ChainInfo
    MerkleProofBuilder --> Database
    Worker --> Host
    Host --> ChainDB
    Host --> Guest
    Host --> Provider
    Server --> ChainDB
    BlockTrie --> MerkleTrie
    Guest --> BlockTrie
    Host --> BlockTrie
Proving Canonicity
It is essential to be able to verify the canonicity of the latest block hash on-chain.
Without that - an attacker would be able to successfully submit the proof generated on:
- a made-up chain with prepared, malicious data;
- a non-canonical fork.
blockhash
Solidity/EVM has a built-in function that allows us to do that.
blockhash(uint blockNumber) returns (bytes32)
It returns a hash of the given block when blockNumber is one of the 256 most recent blocks; otherwise returns zero.
We assert result of this function with the block hash found in the call assumptions of the call proof.
blockhash limitations
However, this method is limited, as it only works for the most recent 256 blocks on a given chain.
256 blocks is not a measure of time. We need to multiply it by block time to know - how much time we have to settle the proof on a specific chain.
- Ethereum: 12 seconds - 51 minutes
- Optimism: 2 seconds - 8.5 minutes
- Arbitrum One: 250ms - 1 minute
With current prover performance - it takes a couple of minutes to generate a proof. That means by the time it's ready, we will already have missed the slot to settle on Arbitrum.
Block Pinning
Instead of waiting for the proof - we can have a smart-contract that pins block hashes we are planning to use in storage.
Therefore, the flow will be like this:
-
As soon as Host is ready to start the proof generation - it will do two things in parallel:
- Send a transaction on-chain pinning the latest block
- Start generating the proof
-
Once the proof is ready, in order to settle on-chain we:
- First try to use
blockhash - If it fails - fallback to the list of pinned blocks
- First try to use
This is not implemented yet.
EIP2935
EIP2935 proposes a very similar solution but on a protocol level. Instead of pinning blocks - it requires nodes to make some (8192) range of blocks available through the storage of system contract. It's planned to be included in a Pectra hard fork and go live on mainnet early 2025.
Solidity
Proving
On-chain verification is implemented by using a customized verification function. It receives a list of arguments in the same order as returned by the Prover (public output).
Proofstructure must always be returned from theProveras the first returned element (more on that here), which means thatProofstructure must also be passed as the first argument to the verification function.
The verification function should use the onlyVerified() modifier, which takes two arguments: the address of a smart contract and a selector of function that was executed in the Prover contract.
See an example verification function below:
contract Example is Verifier {

    function claim(Proof _p, address verifiedArg1, uint verifiedArg2, bytes extraArg) public returns (uint)
        onlyVerified(PROVER_ADDRESS, FUNCTION_SELECTOR) {
        //...
    }

}
proofis not an argument toonlyVerifiedbecause it is automatically extracted frommsg.data.
Data flow
Proving data flow consists of three steps:
Step 1: GuestOutput
It starts at Guest, which returns GuestOutput structure.
GuestOutput consists of just one field - evm_call_result. evm_call_result field is abi encoded Prover function output.
Since Prover returns Proof placeholder as its first returned value, Guest pre-fills length and call_assumptions fields of the Proof structure.
length field of Proof structure is equal to the length of abi encoded public outputs, not including the size of the Proof placeholder.
See the code snippets below for pseudocode:
#![allow(unused)]
fn main() {
pub struct GuestOutput {
    pub evm_call_result: Vec<u8>,
}
}

Step 2: Host output as v_call result
In the next step, the Host replaces the seal field in the Proof placeholder with the actual seal,
which is a cryptographic proof of the Prover's execution.
The Host then returns this via the JSON-RPC v_call method, delivering the seal as a byte string in the result field.
This approach allows the smart contract developer to decode the
v_call result as though they were decoding the Prover function's output directly.
In other words, the v_call result is compatible with, and can be decoded according to, the ABI of the called Prover function.
In this step, the Host also fills in the field callGuestId, which is a hint to the Verifier about the version of the Guest program.
Step 3: Verifier call
Finally, the method on the on-chain smart contract is called to verify the proof. More on that in the next section.
Proof verification
To verify a zero-knowledge proof, vlayer uses a verify function, delivered by Risc-0.
function verify(Seal calldata seal, bytes32 imageId, bytes32 journalDigest) { /* ... */ }
onlyVerified gets seal and journalDigest by slicing it out of msg.data.
length field of Proof structure is used, when guest output bytes are restored in Solidity in order to compute journalDigest.
length field hints the verifier, which bytes should be included in the journal, since they belong to encoding of the public outputs,
and which bytes belong to extra arguments, passed additionally in calldata.
imageId is fixed on blockchain and updated on each new version of vlayer.
ImageId
The ImageId is an indicator of the specific Guest program used to generate a proof.
A simple mental model is that the ImageId is a digest of the ELF file executed within the zkvm and of its boot environment.
More information on ImageId can be found here.
The ImageId can change frequently, especially on testnets, since any update to the Guest code changes the executable bytecode, which in turn changes the ImageId.
This is a desirable feature because it assures developers that the exact Guest code executed is the one they expected.
It also prevents attackers from providing a proof generated by a malicious or incorrect Guest that would falsely attest to a particular state.
The guestCallId returned by the vlayer prover improves error handling and enables the whitelisting of specific ImageIds.
Note: The
callGuestIdfield is not part of thejournalDigestand therefore is not cryptographically validated meaning transaction sender can try to put overwrite this field. However, this does not impact security, since proofs generated for oneImageIdwill fail to verify in the context of a differentImageId.
Data encoding summary
Below, is a schema of how a block of data is encoded in different structures at different stages.

Structures
The Proof structure looks as follows:
struct Proof {
    uint32 length;
    Seal seal;
    CallAssumptions callAssumptions;
}
with Seal having the following structure:
enum ProofMode {
    GROTH16,
    FAKE
}

struct Seal {
    bytes32[8] seal;
    ProofMode mode;
}
and the following structure of CallAssumptions:
struct CallAssumptions {
    address proverContractAddress;
    bytes4 functionSelector;
    uint256 settleBlockNumber;
    bytes32 settleBlockHash;
}
Note that
Proof,SealandCallAssumptionsstructures are generated based on Solidity code from withsol!macro.
Feature-specific
Libraries
library EmailProofLib {
    function verify(UnverifiedEmail memory unverifiedEmail) internal view returns (VerifiedEmail memory);
}

library WebProofLib {
    function verify(WebProof memory webProof, string memory dataUrl) internal view returns (Web memory);
    function recover(WebProof memory webProof) internal view returns (Web memory);
}
Structures
Unverified Email
The UnverifiedEmail is passed into the EmailProofLib.verify() function. It returns the VerifiedEmail struct, described below.
struct UnverifiedEmail {
    string email; // Raw MIME-encoded email
    DnsRecord dnsRecord;
    VerificationData verificationData;
}

// Describes DNS record, according to DoH spec
struct DnsRecord {
    string name;
    uint8 recordType;
    string data;
    uint64 ttl;
}

// Signature data of the DNS record
struct VerificationData {
    uint64 validUntil; // Signature expiration timestamp
    bytes signature; // DNS Notary signature of the serialized DNS record
    bytes pubKey; // Public key used for signature
}
Verified Email
struct VerifiedEmail {
    string from; // Sender email address
    string to; // Recipient email address
    string subject; // Email subject
    string body; // Email body
}
Two Proving Modes
To support two proving modes, vlayer provides a set of smart contracts connected to the Verifier contract, one for each mode:
DEVELOPMENT- Automatically deployed with eachProvercontract, but only on development and test networks. This mode will be used if theProofModedecoded fromSEALisFAKE.PRODUCTION- This requires infrastructure deployed ahead of time that performs actual verification. This mode will be used if theProofModedecoded fromSEALisGROTH16.
Deployment and Release
Environments
The process of releasing vlayer spans across four environments:
- User Environment - web browsers
- Developer Environment - Tools and libraries on the developer's local machine
- vlayer Node Infrastructure - Consists of various server types
- Blockchain Networks - Smart contracts deployed across multiple chains
The diagram below illustrates these environments, along with associated artifacts and key interdependencies:

User Experience
From a delivery perspective, the key aspects of user experience are:
- Reliable, functioning software
- Clear error messages when issues arise
- An easy update process for deprecated software
Users primarily interact with two main artifacts:
- The SDK, embedded within the developer's web application
- The developer's smart contracts, which interface with vlayer smart contracts
- Optionally, a browser extension if the user is engaging with Web Proofs
Unfortunately, both the user and vlayer have limited control over the SDK version in use. The SDK is implemented by the developer and updated only at the developer’s discretion.
Developer Experience
Nightly and Stable Versions
To ensure developers have the best possible experience, we recommend always using the most recent version of vlayer.
A nightly version is published daily and stable version is released regularly and includes tested features and fixes.
- Developers have access to the latest features and bug fixes.
- We can guarantee compatibility among various artifacts.
A potential downside of this approach is that it may require developers to address bugs in their code caused by breaking changes in vlayer.
We recommend using stable version for production. Use nightly versions if you're developing integrations or need early access to new features.
Artifacts and Deployment Cycles
Each environment includes multiple artifacts, each with distinct deployment cycle limitations, as detailed below.
User Environment
- SDK
- Release: vlayer releases new SDK versions in nightly and stable channels.
- Installation: Developers add the SDK to their project dependencies.
- Updates: Neither vlayer nor the user can enforce SDK version updates, making SDK updates the least controllable in terms of version management on the user's end.
Developer Environment (Command Line Tools)
- vlayer Command Line Tools - Used in different contexts:
vlayerwithinitandtestflags, tightly integrated with Foundrycall_server, an optional dependency for local development without relying on the vlayer node infrastructure for proving
- Local Development SDK
- vlayer Smart Contracts - Managed via Soldeer
- Foundry - An external dependency requiring updates synchronized with vlayer to:
- Ensure
testandinitcommands operate in the same directory asforgeand other tools - Support the latest REVM (Rust Ethereum Virtual Machine) changes, including hard-fork and network compatibility
- Ensure
Updating these artifacts is encouraged and is executable via vlayer update.
Blockchain Networks (Smart Contracts)
- User’s Smart Contract - Derived from the
Verifierbase class, with deployment managed externally - Verifier Helper Smart Contract - Soldeer package released in Nightly/Stable cycle. Most important contracts are deployed at stable addresses.
vlayer Node Infrastructure (Servers)
- User Dashboard - A user interface for managing proof history and purchasing
- vlayer Prover - A server for executing
Proveroperations - Chain Indexers - A server for maintaining a Chain Proof Cache, including a JSON RPC server and worker components
- TLS Notary Server - Manages notarization in the Web Proofs context, deployed as needed
- DNS Notary Server - Manages notarization in the Email Proofs context, deployed as needed
- WebSocket Proxy - Handles TCP/IP connection proxying for Web Proofs, deployed as required
- Additional Components - Includes monitoring infrastructure and networked proving systems
All server infrastructure may undergo daily deployments to accommodate updates.
| Artifact | Destination | Release Frequency | Installation/Update Method | Update Control |
|---|---|---|---|---|
| User Environment | ||||
| SDK | Developer's app | Uncontrollable | npm install | Uncontrollable |
| Developer Environment | ||||
| Smart Contracts package | Soldeer | Nightly/Stable | soldeer / vlayer update | Developer |
| vlayer CLI + prover | GitHub | Nightly/Stable | vlayerup / vlayer update | Developer |
| SDK (local) | npm | Nightly/Stable | npm install / vlayer update | Developer |
| Foundry | As needed | foundryup | Developer | |
| Blockchain Networks | ||||
| User's contracts | Blockchain | Uncontrollable | soldeer install | Uncontrollable |
| vlayer contracts | Blockchain | Nightly/Stable | - | vlayer |
| vlayer Node Infrastructure | ||||
| User dashboard | Server | Daily | - | vlayer |
| vlayer prover | Server | Nightly/Stable | - | vlayer |
| Chain Indexers | Server | Stable | - | vlayer |
| Notary Servers (TLS/DNS) | Server | As needed | - | vlayer |
| WebSocket proxy | Server | As needed | - | vlayer |
| Proving network (Bonsai) | Server | Uncontrollable | - | Uncontrollable |
High level architecture
The following diagram depicts the high-level architecture of how the Web Proof feature works:

Arrows on the diagram depict data flow between the actors (rectangles).
Generating and ZK-proving a Web Proof consists of the following steps:
- vlayer SDK (used in a webapp) requests a Web Proof from vlayer browser extension.
- The extension opens a TLS connection to a Server (2a) through a WebSocket proxy (2b), while conducting MPC-TLS session with the Notary (2c), generating a Web Proof of an HTTPS request to the Server. The WebSocket proxy is needed to provide the extension access to low-level details of the TLS handshake, which is normally not available within the browser, while the Notary acts as a trusted third party who certifies the transcript of the HTTPS request (without actually seeing it). For details of how the TLSN protocol works, please check TLSN documentation.
- The Web Proof is then sent back to vlayer SDK.
- vlayer SDK makes a
v_callto vlayer Prover server, including the Web Proof as calldata to Prover Smart Contract. - Prover Smart Contract calls
web_proof.verify()custom precompile (see Precompiles), which validates the Web Proof, parses the HTTP transcript and returns it to Prover Smart Contract. - Prover Smart Contract then calls
json.get_string()custom precompile (see Precompiles), which parses JSON response body from the HTTP transcript and returns value for the specified key. - When Prover Smart Contract execution successfully finishes, vlayer Prover returns ZK proof of the Contract execution back to the SDK. The ZK proof can then be verified on-chain.
Email Proofs Architecture
Email proof sequence flow
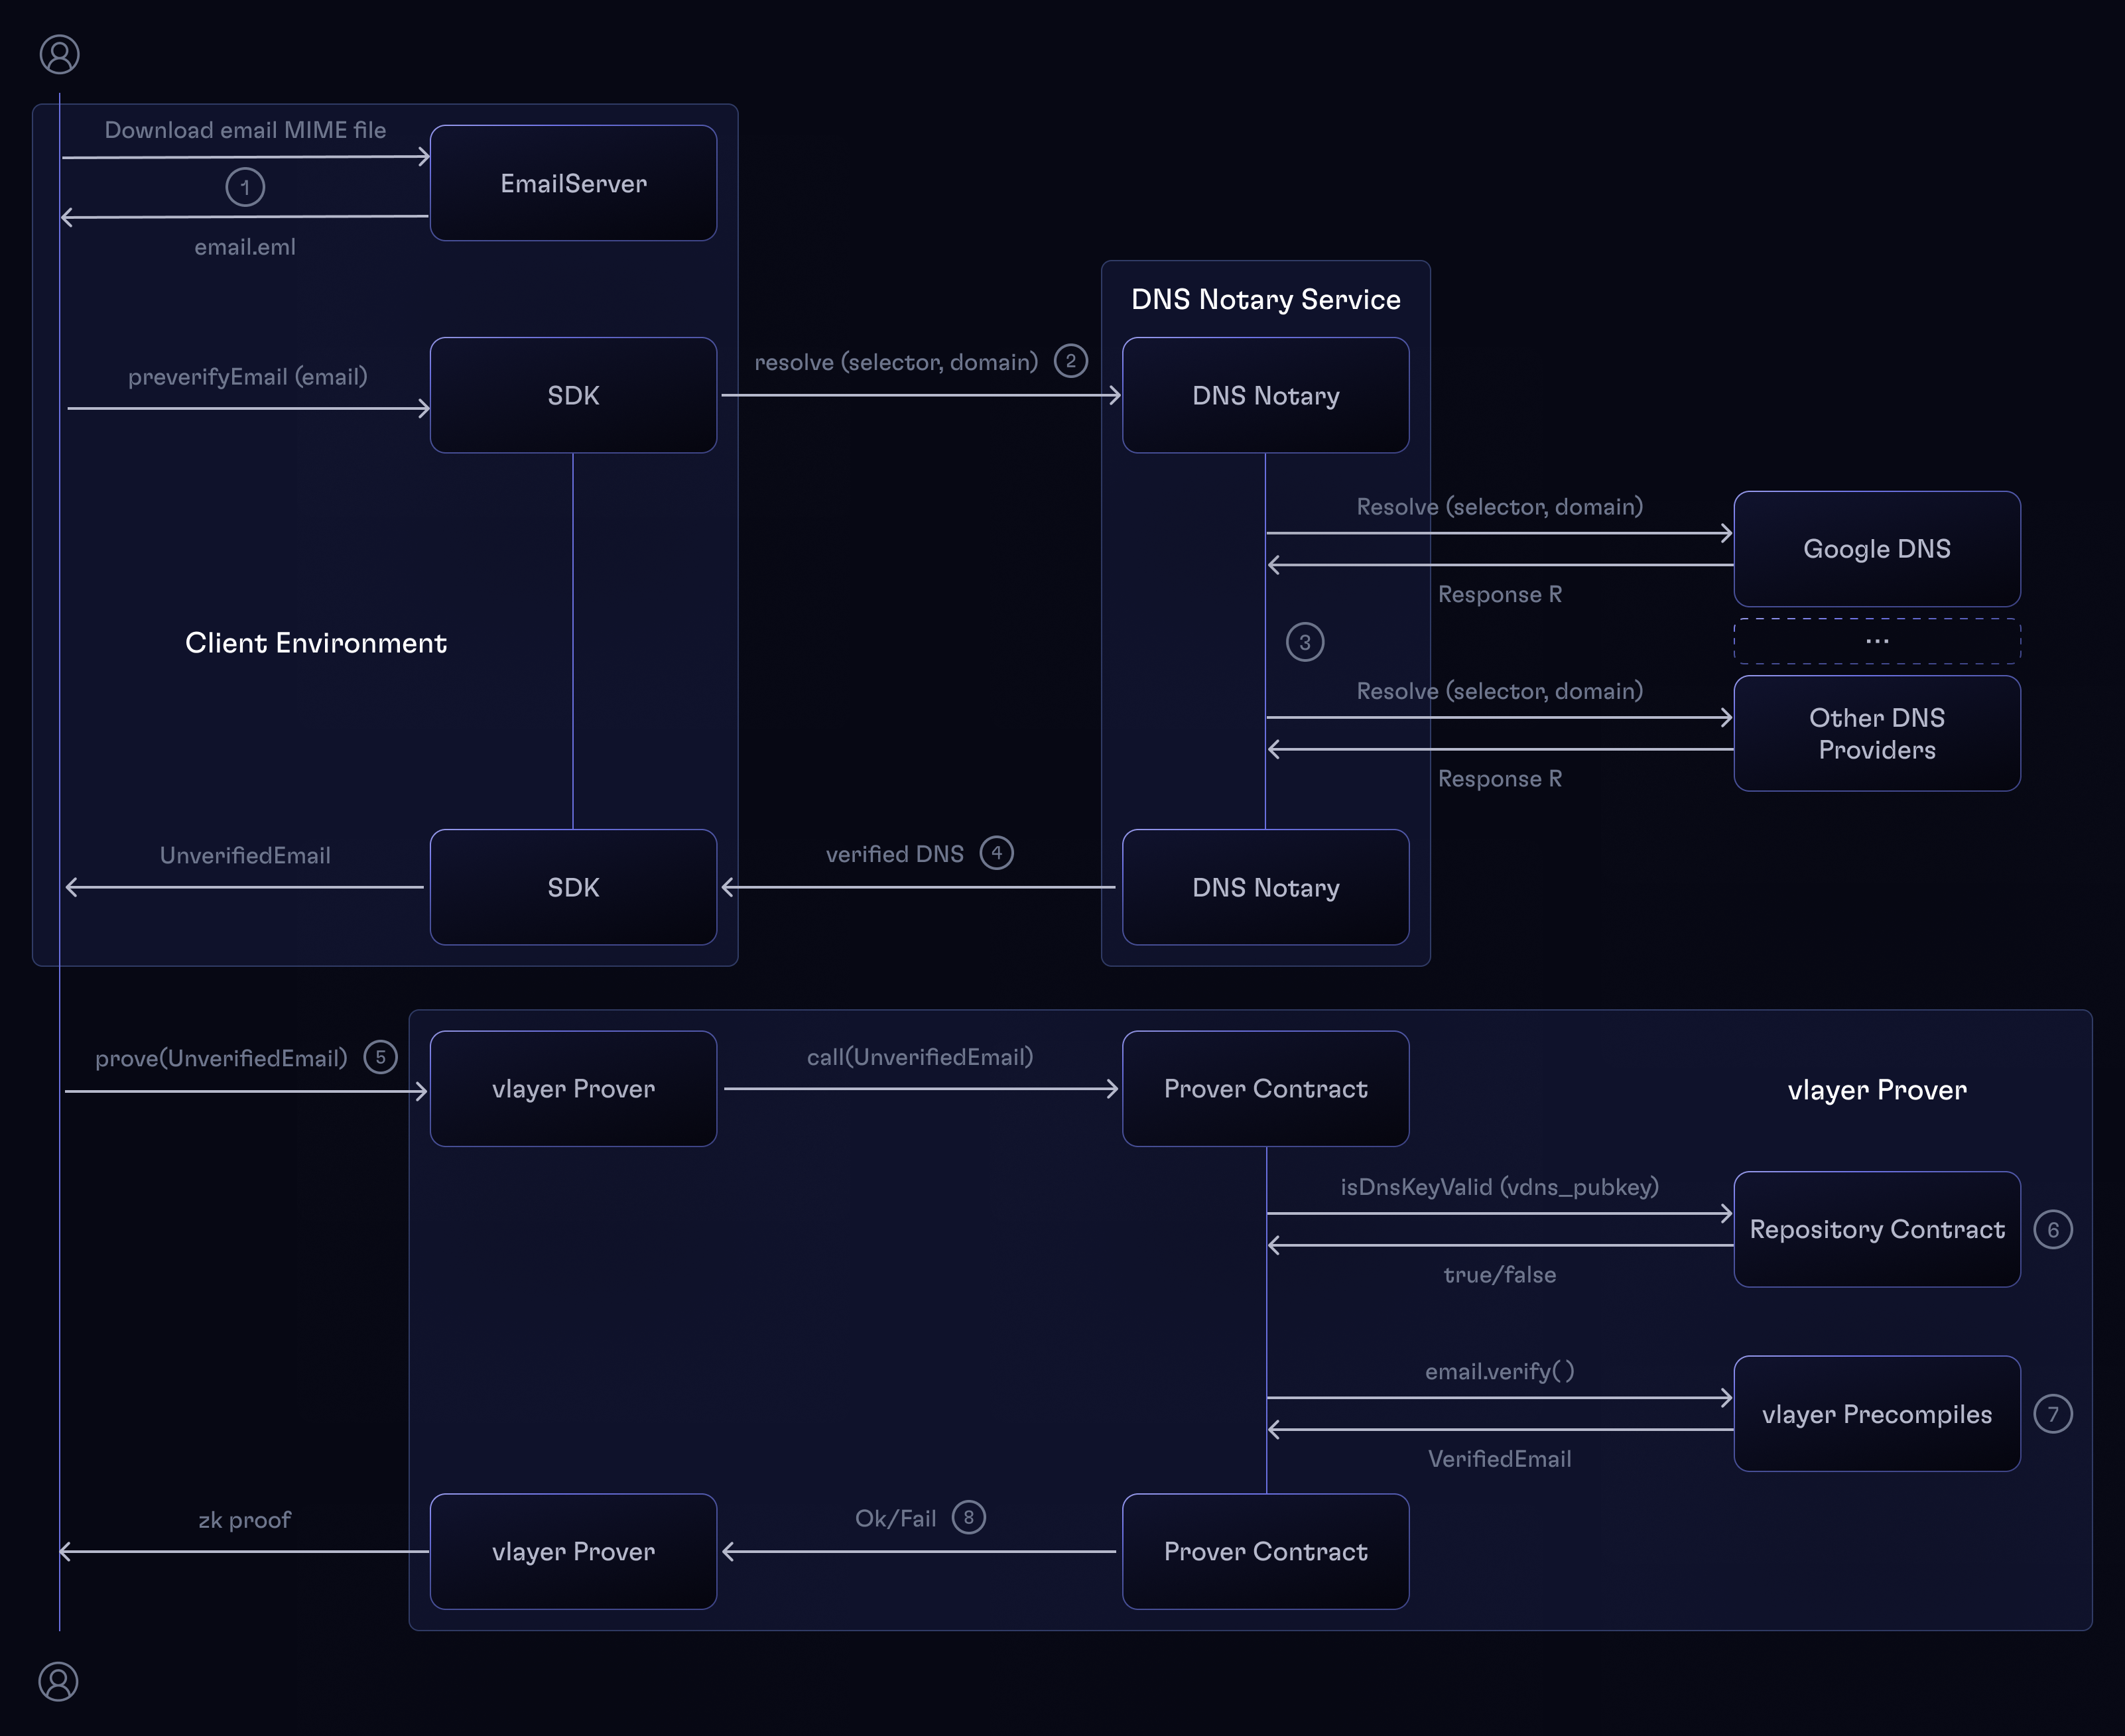
Generating and ZK-proving an Email Proof consists of the following steps:
- The received email MIME file is extracted from the email client.
- The
preverifyEmailin the SDK prepares theUnverifiedEmailstruct that is ready to be sent to the Prover Contract.- Performs basic preverification - checks if the
DKIM-Signatureheader is present. - Calls the
DNS Notaryto get the verification data of the sender's domain. - Note that all these steps can be performed without the
vlayerSDK.
- Performs basic preverification - checks if the
- The
DNS Notaryfetches the public key used to sign the email from a number of DNS providers, compares the results, and if there's a consensus among them, signs the result with its private key. - The DNS record with it's signature and the raw email together form the
UnverifiedEmailstruct. - A
v_callis made to the vlayer server with theUnverifiedEmailstruct as well as the rest of the Prover contract arguments as calldata, chain ID, and the address of the deployed Prover contract. - The Prover contract must use the
EmailProofLib, where theDNS Notarypublic key is verified. TheEmailProofLiblibrary calls theRepositorycontract to verify whether theDNS Notarypublic key is valid. It also checks the signature TTL against the current block timestamp. - Next, the
EmailProofLibcontract calls theemail_proof.verify(UnverifiedEmail)custom precompile (see Precompiles), which validates the Email Proof, parses the email MIME file, and returns aVerifiedEmail. - If the verification is successful, the
EmailProofLibreturns theVerifiedEmailstruct to the Prover contract. Otherwise, it will revert.
vlayer JSON-RPC API
vlayer exposes one RPC endpoint under / with the following methods:
v_callv_versionsv_getProofReceiptv_proveChain
With general format of request looking a follows.
 {
    "method": "<method name>",
    "params": [{
        "<params object>"
    }]
 }
And the response format below.
{
    "jsonrpc": "<version>",
    "result": {
        "<result object>"
    }
}
v_call
v_call is the core endpoint that vlayer provides, with the following format request:
{
    "method": "v_call",
    "params": [{ // CallParams
        "to": "<contract address>",
        "data": "0x<abi encoded calldata>",
    }, { // CallContext
        "chain_id": "<desired chain id>",
        "gas_limit" "<maximum gas limit (default in SDK: 1_000_000)>",
    }]
}
and the response:
{
    "jsonrpc": "2.0",
    "result": {
        "hash": "<proving hash>",
        "evm_call_result": "...",
        "proof": "<abi encoded result of preflight execution>",
    }
}
v_versions
v_versions is the health check/versions endpoint
{
    "method": "v_versions",
    "params": []
}
and the response:
{
    "jsonrpc": "2.0",
    "result": {
        "call_guest_id": "0x8400c1983ee247ec835e565f924e13103b7a6557efd25f6b899bf9ed0c7ca491",
        "chain_guest_id": "0x9b330c5fda07d640226342a91272a661b9e51ad6713427777720bc26489dbc75",
        "semver": "1.2.3-dev-20241231-ae03fe73"
    }
}
v_getProofReceipt
Query
To get result of v_call query v_getProofReceipt.
{
    "method": "v_getProofReceipt",
    "params": {
        "hash": "<proof request hash>",
    }
}
There are 5 possible status values:
queuedwaiting_for_chain_proofpreflightprovingready
If status is ready, the server will respond with a proof receipt.
Queued, WaitingForChainProof, Preflight, Proving
{
    "jsonrpc": "2.0",
    "result": {
        "status": "queued" | "waiting_for_chain_proof" | "preflight" | "proving",
    }
}
Ready
{
    "jsonrpc": "2.0",
    "result": {
        "status": "ready",
        "receipt": {
            "data": {
                "proof": "<calldata encoded Proof structure>",
                "evm_call_result": "<calldata encoded result of execution>",
            },
            "metrics": {
                "gas": 0,
                "cycles": 0,
                "times": {
                    "preflight": 0,
                    "proving": 0,
                },
            },
        }
    }
}
evm_call_result is an ABI encoded result of the function execution and proof is a Solidity Proof structure to prepend in verifier function. Note that settlement block is only available in receipt, as we don't want to make assumption on when the the settlement block is assigned.
metrics contains aggregated statistics gathered during proof generation. gas corresponds to gas used in the preflight step, while cycles is the number of CPU cycles utilized during proving. Additionally, times.preflight and times.proving are both expressed in milliseconds.
Error
{
  "jsonrpc": "2.0",
  "error": {
    "message": "<error message>",
  }
}
v_getChainProof
Query
This call takes chain ID and an array of block numbers as an argument.
An example call could look like this:
{
  "method": "v_getChainProof",
  "params": {
    "chain_id": 1,
    "block_numbers": [
      12_000_000,
      12_000_001,
      20_762_494, // This should be recent block that can be verified on-chain
    ]
  }
}
Success
It returns two things:
- Sparse MPT that contains proofs for all block numbers passed as arguments.
- 𝜋 - the zk-proof that the trie was constructed correctly (invariant that all the blocks belong to the same chain is maintained).
{
    "result": {
        "proof": "0x...", // ZK Proof
        "nodes": [
          "0x..." // Root node. It's hash is proven by ZK Proof
          "0x..." // Other nodes in arbitrary order
          ...
        ]
    }
}
Gas meter JSON-RPC API
v_allocateGas
{
  "method": "v_allocateGas",
  "params": [
      {
          "hash": "0xdeadbeef",
          "gas_limit": 1000000,
          "time_to_live": 3600
      }
  ]
}
v_refundUnusedGas
{
  "method": "v_refundUnusedGas",
  "params": [
      {
          "hash": "0xdeadbeef",
          "gas_used": 1000000,
          "computation_stage": "preflight"
      }
  ]
}
{
  "method": "v_refundUnusedGas",
  "params": [
      {
          "hash": "0xdeadbeef",
          "gas_used": 1000000,
          "computation_stage": "proving"
      }
  ]
}
Proof composition
Proof composition is explained in RISC Zero documentation, the verifiable computation tooling used by vlayer. For more details, refer to their resources:
This page aims to describe it from a practical perspective focusing on our use-case.
Usage
We use proof composition in Chain Proofs. The trie is correct if:
- the previous trie was correct;
- the operation executed is correct.
In order to verify first point - we need to verify a ZK proof (correctness of the previous step) from within a ZK proof (correctness of this step).
Implementation
Proofs that we store in the DB are bincode serialized Receipts.
Receipt contains:
Journal- proof output: BytesInner receipt- polymorphic receipt
enum InnerReceipt {
    /// Linear size receipt. We don't use that
    Composite,
    /// Constant size STARK receipt
    Succinct,
    /// Constant size SNARK receipt
    Groth16,
    /// Fake receipt
    Fake,
}
In order to use one proof within another in ZKVM - we need to convert a Receipt into an Assumption.
This is trivial as AssumptionReceipt implements From<Receipt>.
executor_env_builder.add_assumption(receipt.into());
Within Guest - one should use env::verify function:
use risc0_zkvm::guest::env;

env::verify(HELLO_WORLD_ID, b"journal".as_slice()).unwrap();
This function accepts guest ID, journal and not the proof as all the available proofs are stored within env.
Important
Proof composition only works on Succinct proofs and not Groth16 proofs.
In Chain Proofs - we store all proofs as Succinct receipts. Chain Proof gets injected into Call Proof as Succinct receipt. In the end Call Proof gets converted into a Groth16 receipt to be verified in a Smart Contract
E2E Testing Setup
Overview
This document describes the setup phase of end-to-end (E2E) testing for the vlayer system as implemented in the e2e-test.sh script. The setup phase initializes all necessary services, configurations, and components required for testing.
Key Components
1. Environment Configuration
The setup phase begins by configuring the environment:
# Environment variables setup
VLAYER_HOME=$(git rev-parse --show-toplevel)
export PATH="${VLAYER_HOME}/target/debug:${PATH}"

# Load environment variables
[ -f "${VLAYER_HOME}/.env.local" ] && source "${VLAYER_HOME}/.env.local"

# Set default values
VLAYER_ENV=${VLAYER_ENV:-dev}
BUILD_CLI=${BUILD_CLI:-1}
VLAYER_HOMEpoints to the root directory of the vlayer project- Environment variables from
.env.localare loaded if the file exists - Default values are set for environment-specific configurations
2. Helper Scripts
The setup phase sources several helper scripts that provide utility functions:
source "$(dirname "${BASH_SOURCE[0]}")/common.sh"
source "$(dirname "${BASH_SOURCE[0]}")/lib/examples.sh"
source "$(dirname "${BASH_SOURCE[0]}")/lib/proving_mode.sh"
source "$(dirname "${BASH_SOURCE[0]}")/lib/e2e.sh"
source "$(dirname "${BASH_SOURCE[0]}")/lib/build-packages.sh"
These scripts provide functions for the following stages of e2e testing:
-
Environment Setup:
set_proving_mode: Configures proving mode (dev/prod)generate_ts_bindings: Generates TypeScript bindings for contractsbuild_sdk: Builds the SDK package
-
Service Initialization:
ensure_services_built: Compiles the required service binaries (call_server, chain_server, worker, dns_server) ifBUILD_SERVICESequals1startup_chain_worker: Starts chain worker processesstartup_chain_server: Starts the chain server for RPC communicationstartup_vlayer: Starts the vlayer REST serverstartup_vdns_server: Starts the DNS serverstartup_chain_services: Coordinates starting all chain-related serviceswait_for_port_and_pid: Waits for services to be ready on specific ports
The service initialization follows a specific sequence: first
ensure_services_builtcompiles all service binaries, then Docker services are started, followed by chain workers, chain server, vlayer server, and finally the DNS server. -
Test Environment Preparation:
generate_vlayer_init_config: Creates configuration for vlayer initializationensure_cli_built: Ensures the CLI is builtinit_template: Initializes the test template
-
Test Execution:
silent_unless_fails: Controls output of command executionrun_prover_script: Runs the prover script
-
Cleanup:
cleanup: Cleans up all services and temporary fileskill_service: Terminates specific services by PID
3. Proving Mode Configuration
set_proving_mode
The proving mode determines how proofs are generated and verified:
devmode uses fake proofs for faster testingprodmode uses production-grade proofs (Bonsai)
This configuration affects both the server and worker components:
- Sets
SERVER_PROOF_ARG(fake/groth16) - Sets
WORKER_PROOF_ARG(fake/succinct)
4. TypeScript Bindings and SDK Generation
generate_ts_bindings
build_sdk
These steps ensure that:
- The TypeScript bindings for smart contracts are up-to-date
- The SDK is built with the latest changes
5. Service Startup
DOCKER_COMPOSE_SERVICES="anvil-l1 anvil-l2-op notary-server"
source ${VLAYER_HOME}/bash/run-services.sh
This starts the required services:
anvil-l1: Local Ethereum L1 nodeanvil-l2-op: Local Optimism L2 nodenotary-server: Notary server
The service startup orchestrates:
- Docker containers for blockchain nodes
- Chain workers for precomputing chain proofs
- Chain server for making chain proofs available over JSON-RPC
- vlayer server for call proof generation
6. Chain Worker Configuration
Chain workers are configured based on the test environment:
- In devnet (Anvil), the worker connects to
http://localhost:8545with chain ID31337 - In testnet, the worker connects to external RPC endpoints with their respective chain IDs
Workers are started with parameters:
RUST_LOG=${RUST_LOG:-info} ./target/debug/worker \
    --db-path "${db_path}" \
    --rpc-url "${rpc_url}" \
    --chain-id "${chain_id}" \
    --proof-mode "${WORKER_PROOF_ARG}" \
    --confirmations "${CONFIRMATIONS:-1}" \
    --max-head-blocks "${MAX_HEAD_BLOCKS:-10}" \
    --max-back-propagation-blocks "${MAX_BACK_PROPAGATION_BLOCKS:-10}"
7. Test Environment Preparation
cd $(mktemp -d)
generate_vlayer_init_config
ensure_cli_built
init_template
These steps:
- Create a temporary directory for testing
- Generate the vlayer initialization configuration (
generate_vlayer_init_config) - Ensure the CLI tool is built (
ensure_cli_built) - Initialize a test template with the example code (
init_template)
Key Configurables
The following environment variables can be passed to the e2e-test.sh script to customize its behavior:
| Variable | Default | Description | Passed to Script? |
|---|---|---|---|
VLAYER_ENV | dev | Environment type (dev/prod) | ✓ |
PROVING_MODE | dev | Proving mode (dev/prod) | ✓ |
BUILD_SERVICES | 1 | Controls whether service binaries are compiled; set to 0 to skip compilation if binaries already exist | ✓ |
BUILD_CLI | 1 | Whether to build the CLI | ✓ |
EXAMPLE | Required | Name of the example to test (must be set) | ✓ |
CONFIRMATIONS | 1 | Number of confirmations required for chain workers | ✓ |
MAX_HEAD_BLOCKS | 10 | Maximum head blocks to process in chain workers | ✓ |
MAX_BACK_PROPAGATION_BLOCKS | 10 | Maximum back propagation blocks in chain workers | ✓ |
VLAYER_TMP_DIR | auto-generated | Directory for temporary files | ✓ |
CHAIN_NAME | anvil | Chain to use (anvil or a testnet like optimismSepolia) | ✓ |
For prod mode with external chains, these additional variables are required:
| Variable | Default | Description | Required When |
|---|---|---|---|
BONSAI_API_URL | https://api.bonsai.xyz/ | URL for Bonsai API | PROVING_MODE=prod |
BONSAI_API_KEY | None | API key for Bonsai | PROVING_MODE=prod |
QUICKNODE_API_KEY | None | API key for QuickNode | CHAIN_NAME!=anvil |
QUICKNODE_ENDPOINT | None | Endpoint for QuickNode | CHAIN_NAME!=anvil |
ALCHEMY_API_KEY | None | API key for Alchemy | CHAIN_NAME!=anvil |
Only one of QuickNode or Alchemy API key is required.
Optional Rollup (L2) Endpoint Overrides:
In the event the used chain endpoint does not support required L2 methods (optimism_outputAtBlock),
an endpoint override is needed with an RPC provider that does support it.
| Variable | Default | Description |
|---|---|---|
OPTIMISM_ROLLUP_ENDPOINT | None | Override URL for Optimism mainnet |
OPTIMISM_SEPOLIA_ROLLUP_ENDPOINT | None | Override URL for Optimism sepolia |
BASE_ROLLUP_ENDPOINT | None | Override URL for Base mainnet |
BASE_SEPOLIA_ROLLUP_ENDPOINT | None | Override URL for Base sepolia |